It is so easy to Create an account via our App.
For new users of Stellar Network:
- Open FIREFLY App, click "Create"

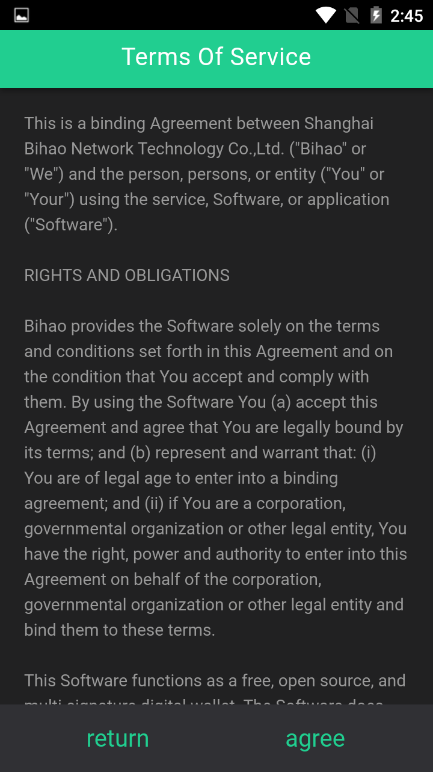
- Read the "Terms of Service", click "Agree" to move on
- Fill out the Required data, then click "Next step"
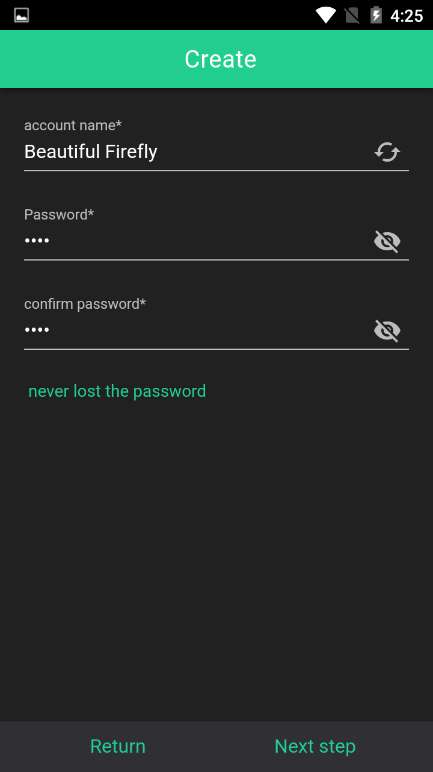
Tips: You can click "Refresh" Button to Generate a new Account Name or input a Name directly.
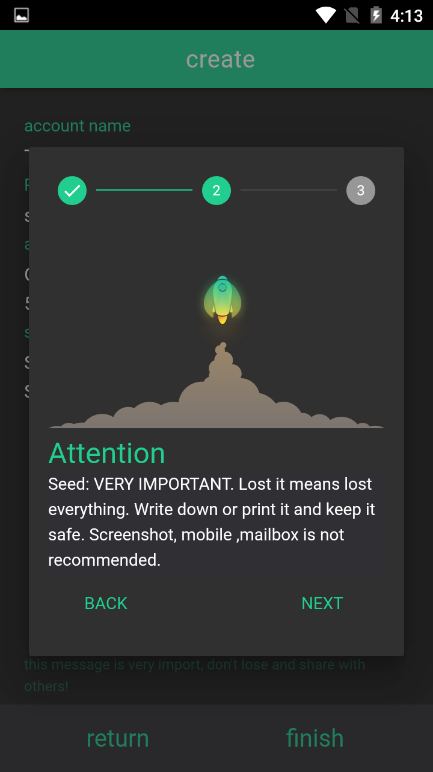
- Attention
You will read many important Attention here,

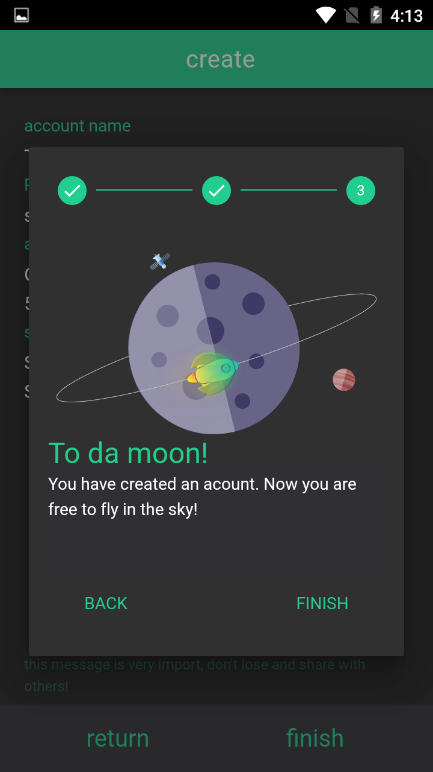
Congratulation! Your account had been created.
- Review the details of your account, write the Secret Seed down and keep it safe.
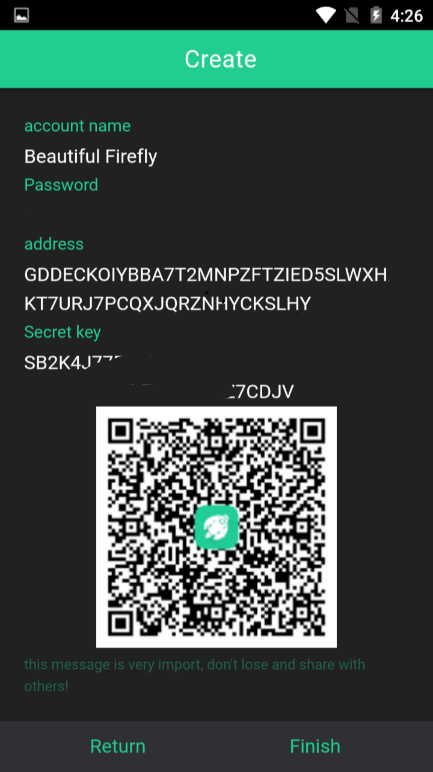
Now you have a Stellar Account.
When you open my FIREFLY Wallet, you will jump to this webpage from the app.
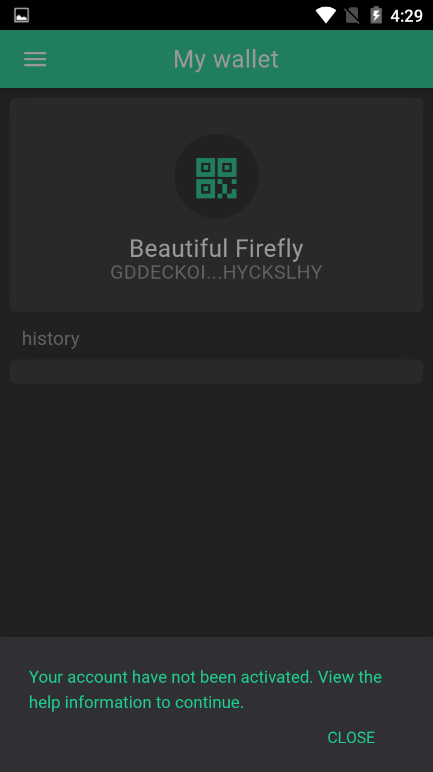
A new account is inactive account.
Why?
In order to prevent people from making a huge number of unnecessary accounts, each account must have a minimum balance of 20 lumens (lumens are the built-in currency of the Stellar network). Since you don't yet have any lumens, though, you can't pay for an account. In the real world, you'll usually pay an exchange or somebody that sells lumens in order to create a new account.
Or, you can ask the CSA in our forum to create an account for you.
When you buy XLM (more than 20 lumens), your account is active now.
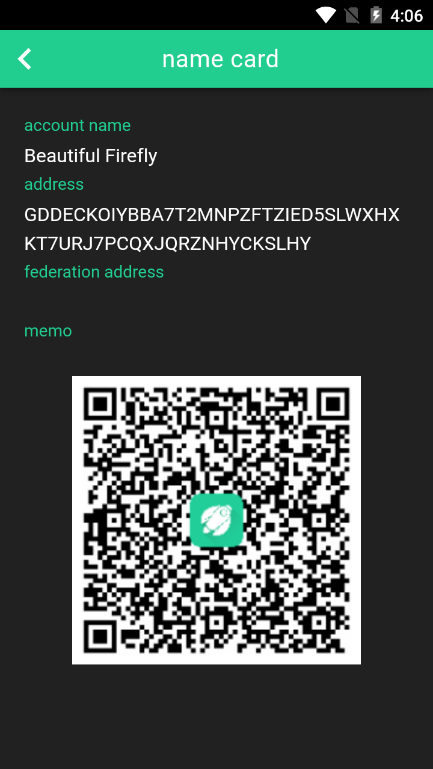
If you want to receive you XLM, you can share your account address or your QR code to the sender.
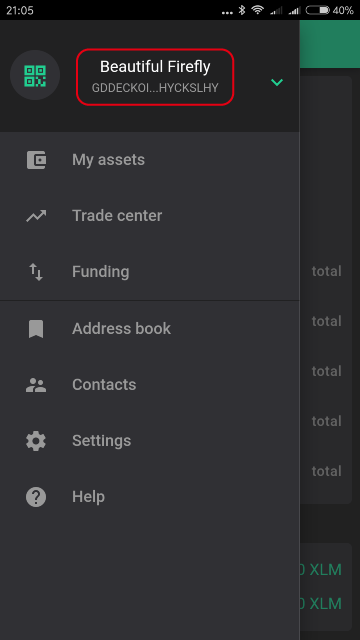
The address and the QR code can be found in you "Name Card".
The route is "Menu"→"QR" →"Name Card"
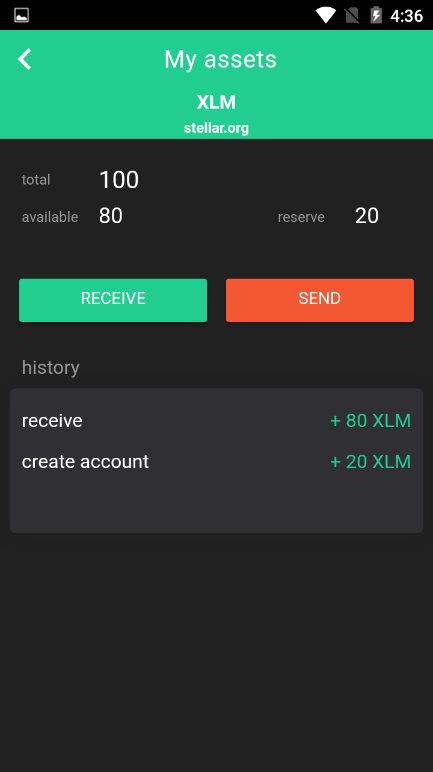
Or you can use "Receive" in "My assets".
The route is "Menu" → "My assets" → Click/ Slide "XLM" → "Receive".
In the "Receive" Page, you can set the Receiving Amount to Generate QR code immediately what contains the address and amount
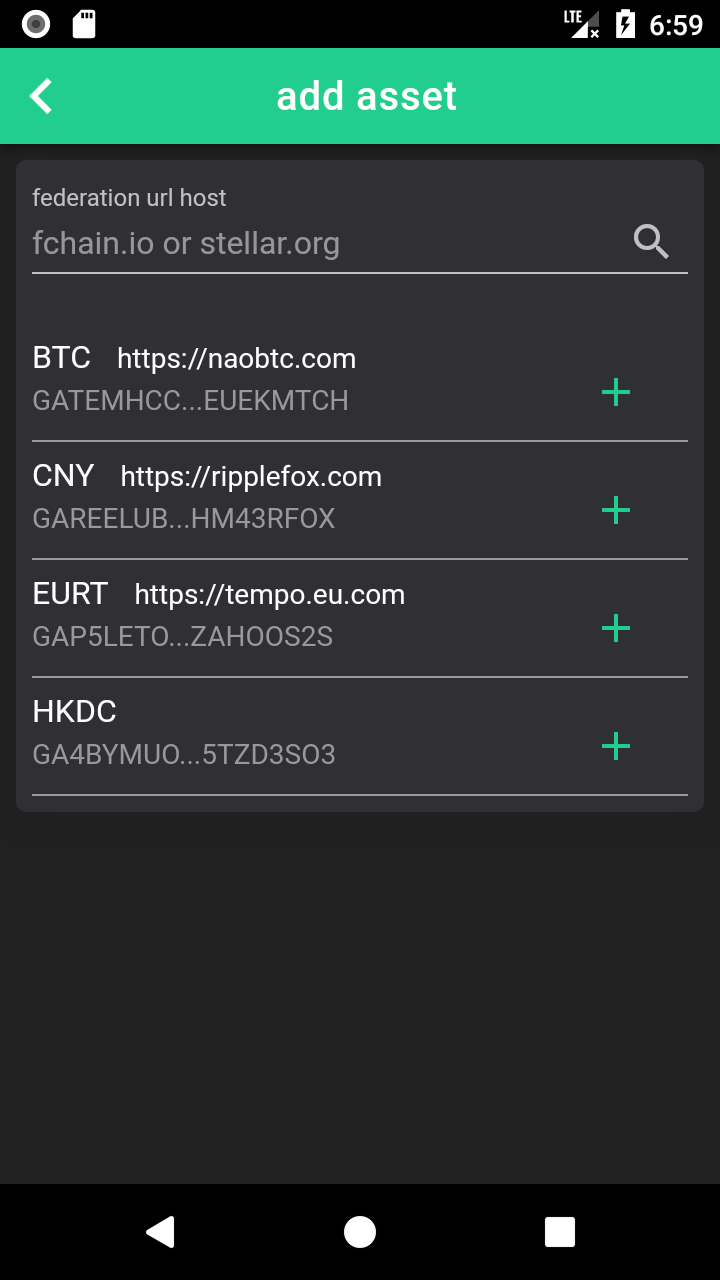
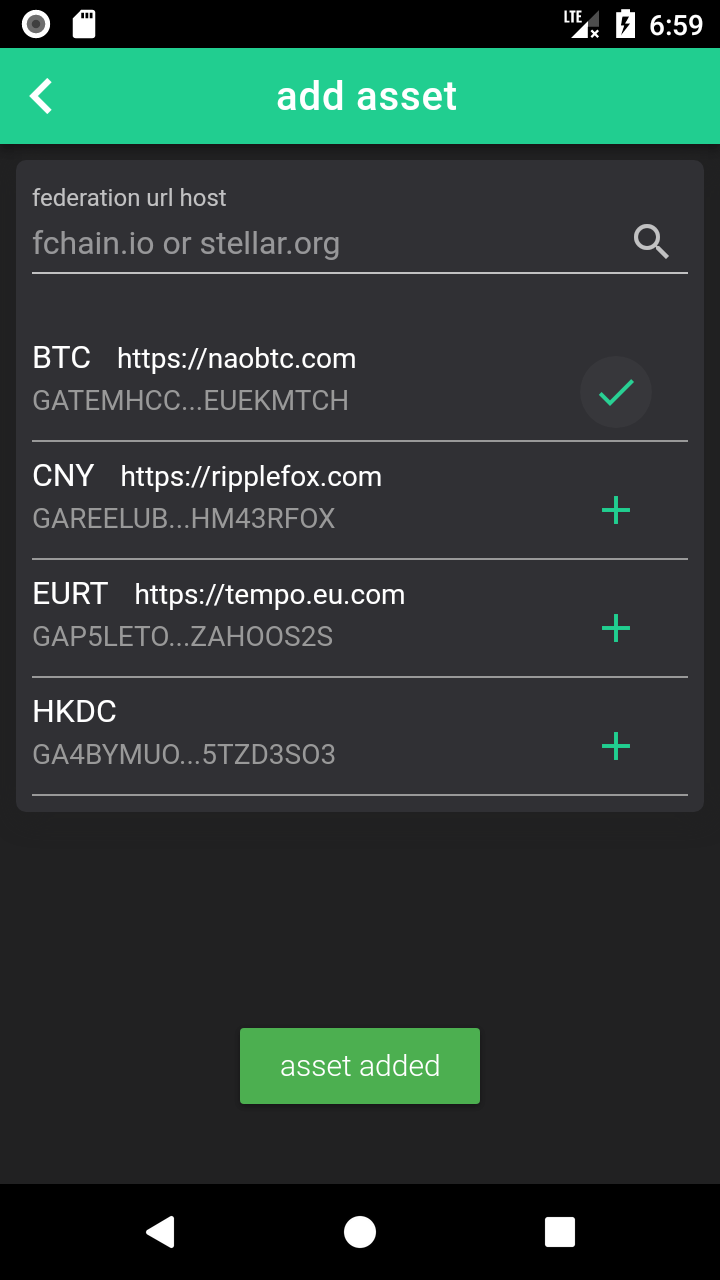
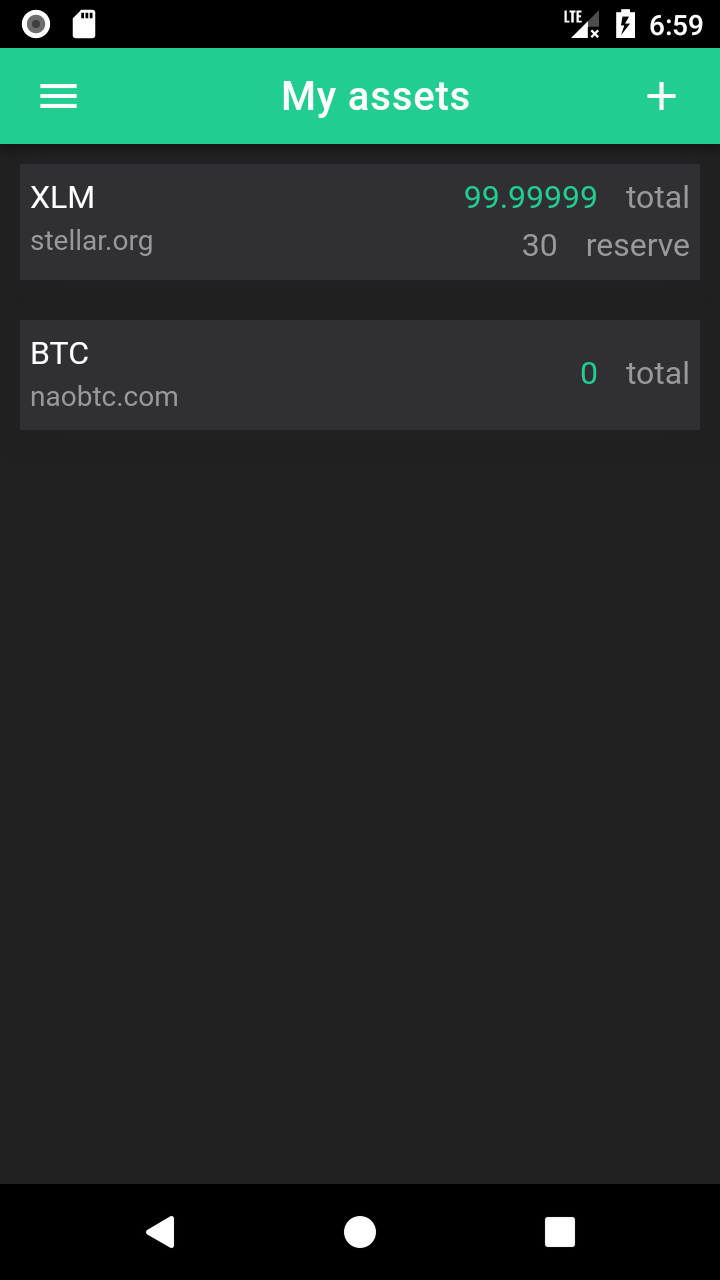
In Stellar Network, if you want to track, hold, and transfer one asset, coin or token, you need to add this asset first. And every new asset will reserve 10 XLM in your account.
Now let us open the FIREFLY Wallet to add a new asset.
"Menu"→"My assets" →"+"→ choose one asset on the list →"+"→ wait 2-5 seconds → Asset added
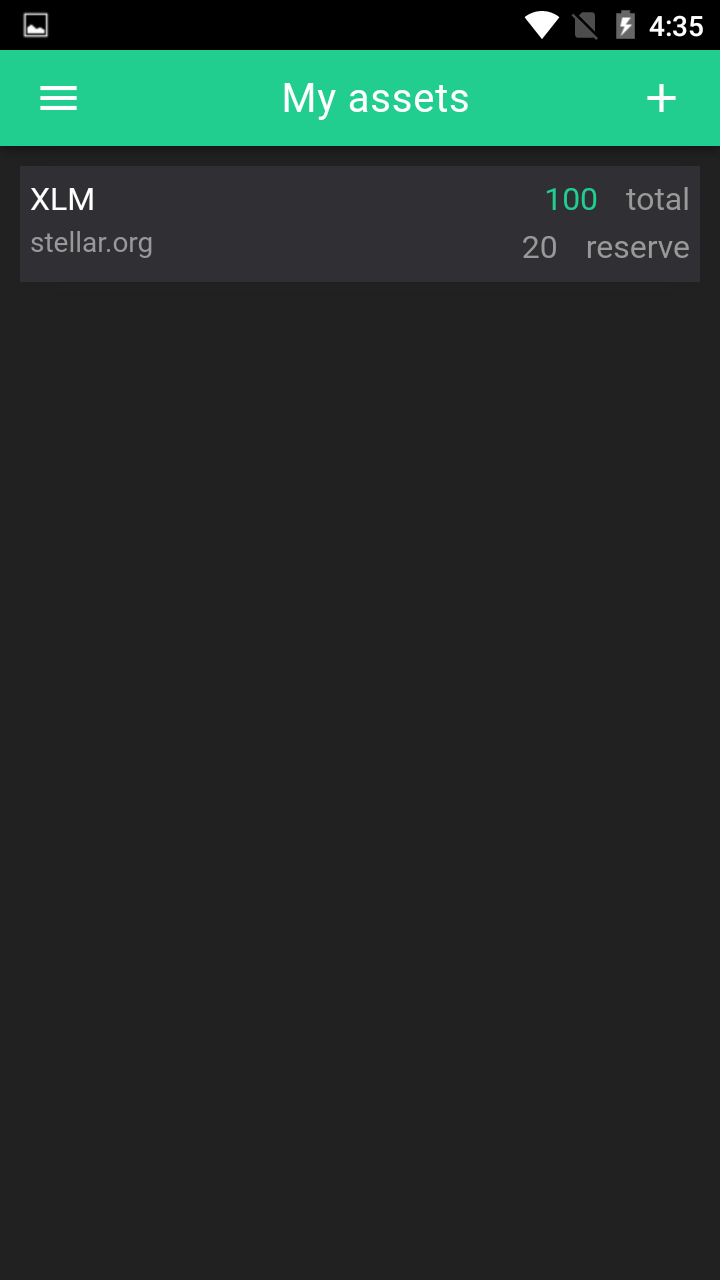

When you return the "My assets" page, you will see BTC there.
If you want to send you asset to someone, you can use "Send" in "My assets".
The route is "Menu" → "My assets" → Click/ Slide one asset on the list → "Send".
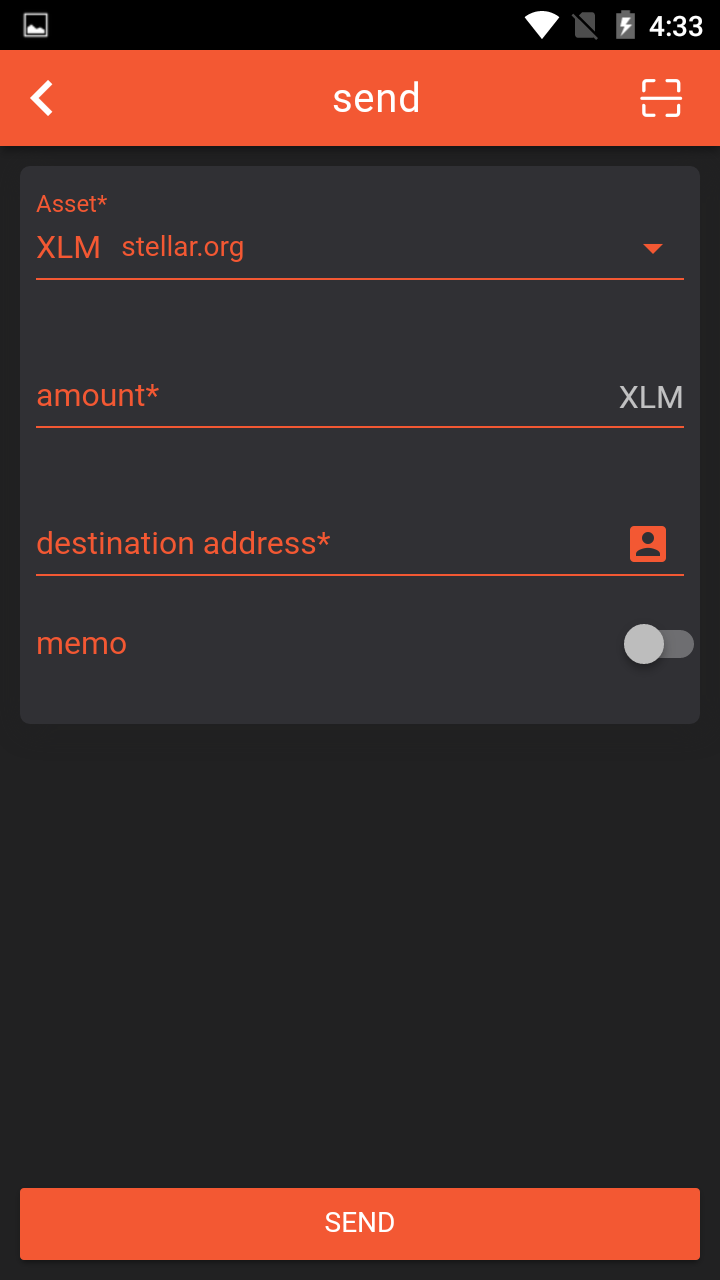
In the "Send" Page, you can fill out the destination address, Scan the QR code or click "Contacts" to choose a contact from the contacts list.
If you have some words or some codes to send with the asset, you can click the switch of memo.
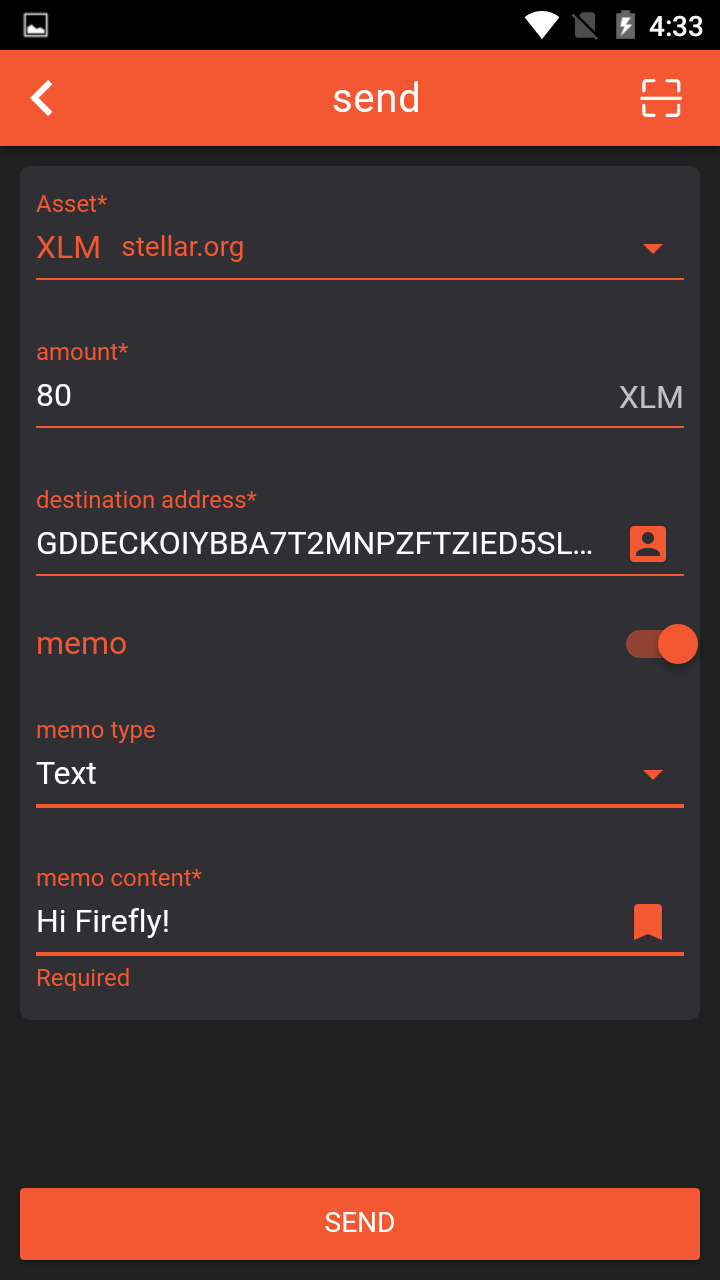
Please check the details of this asset sending, because the asset transmission is irrevocable. Then click "Send", wait 2-5 seconds, Asset sent successfully.
The route is "Menu" → "Trade Center" → Click/ Slide one market on the list → "Trade" → Access Trading Page.
Note: Only the assets you added can be traded. If not, add it first in "My Assets" page. Or you will see the Notice as below:
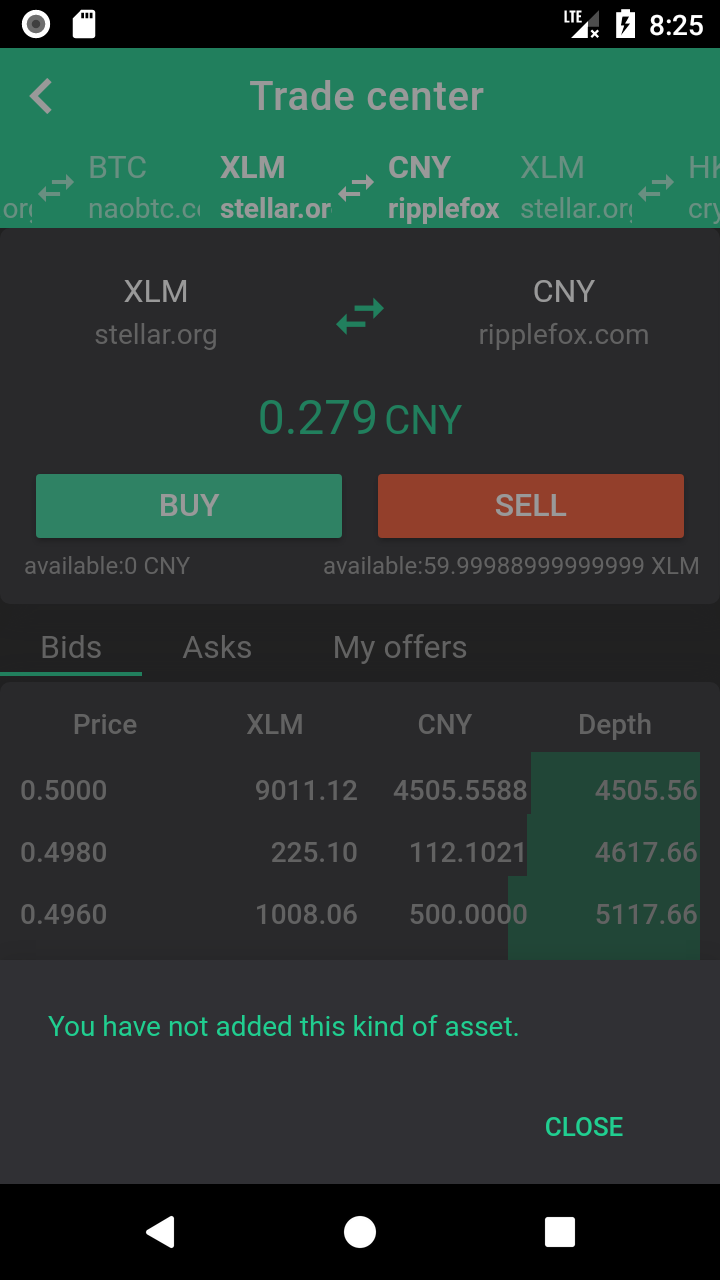
In the Trading Page, you view Bids order book, Asks order book and My offers.
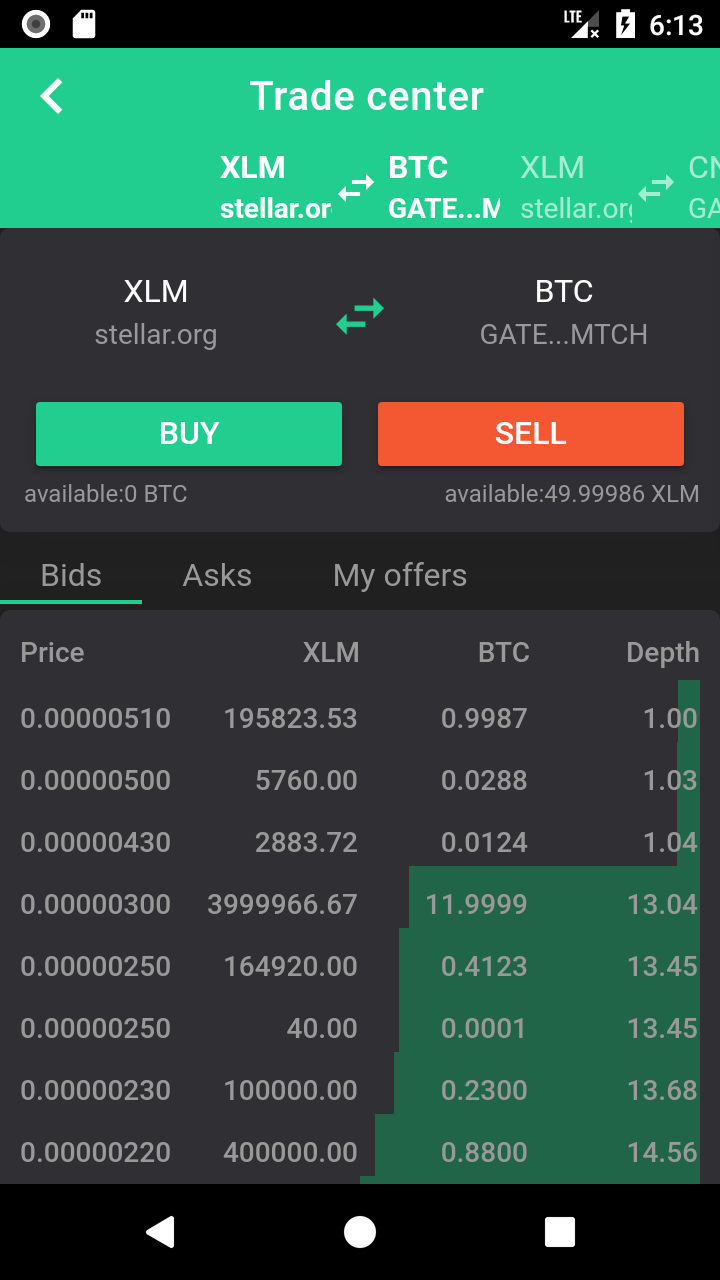
And you can click "swap" button to flip the trade pair
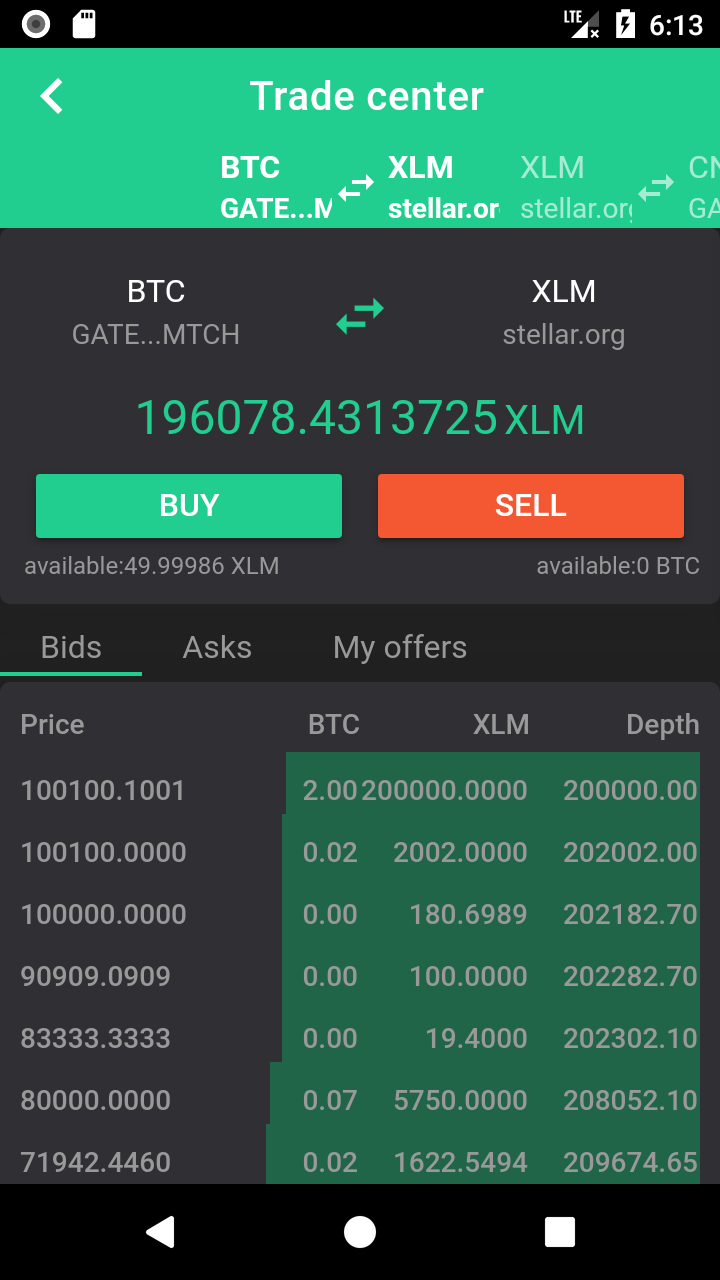
Now you can try to buy some BTC, click "BUY", fill out the bids order or click the orders listed on the order book to copy the order details, check your order, then click "BUY"
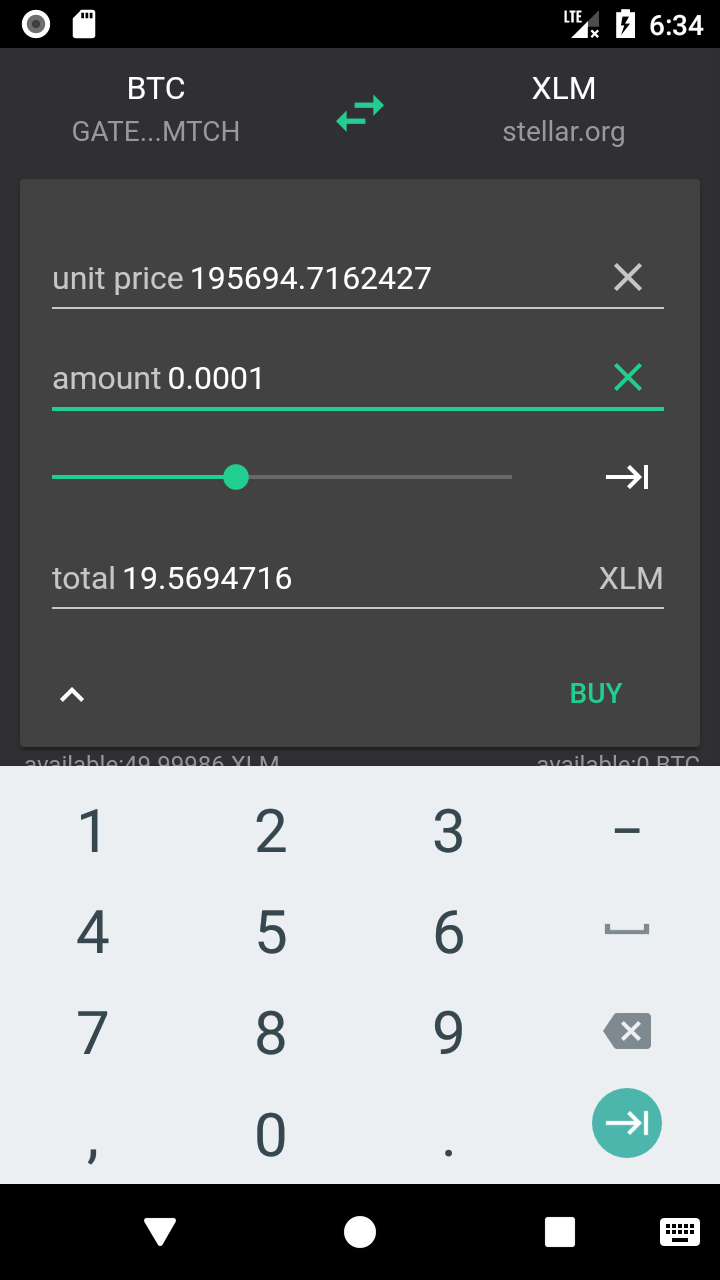
Wait 2-5 seconds
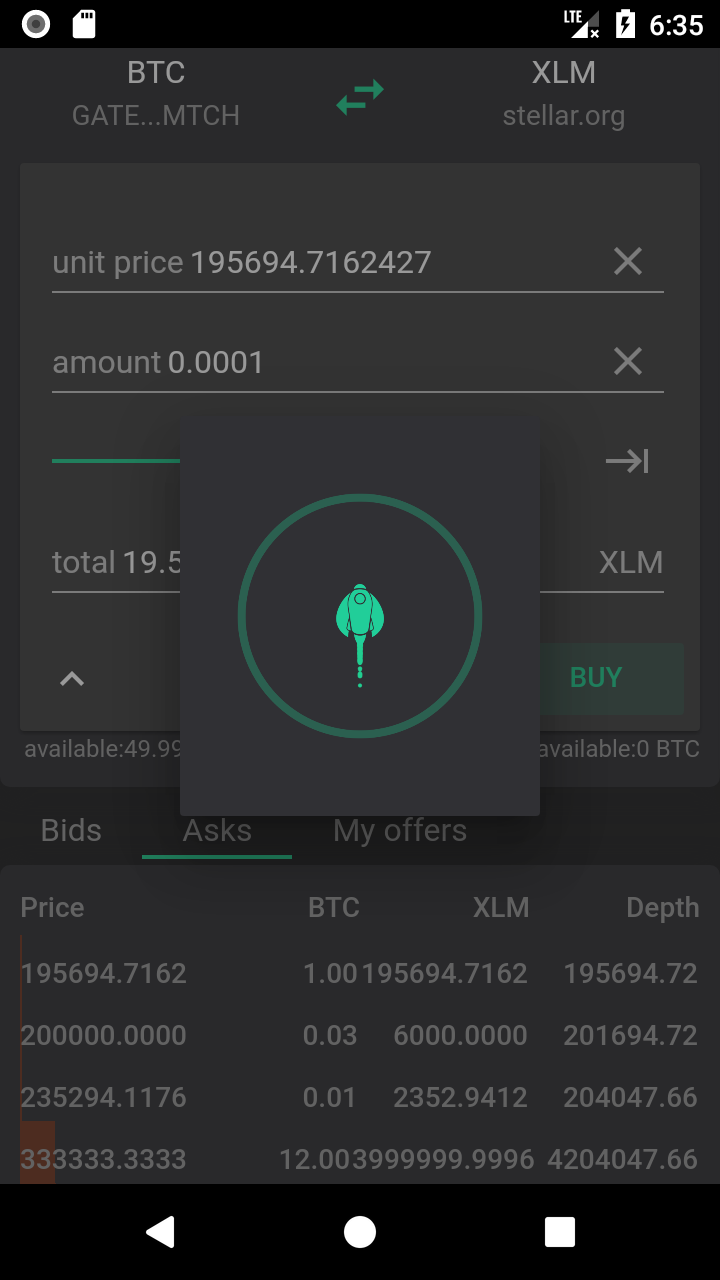
Asset Buy offered successfully.
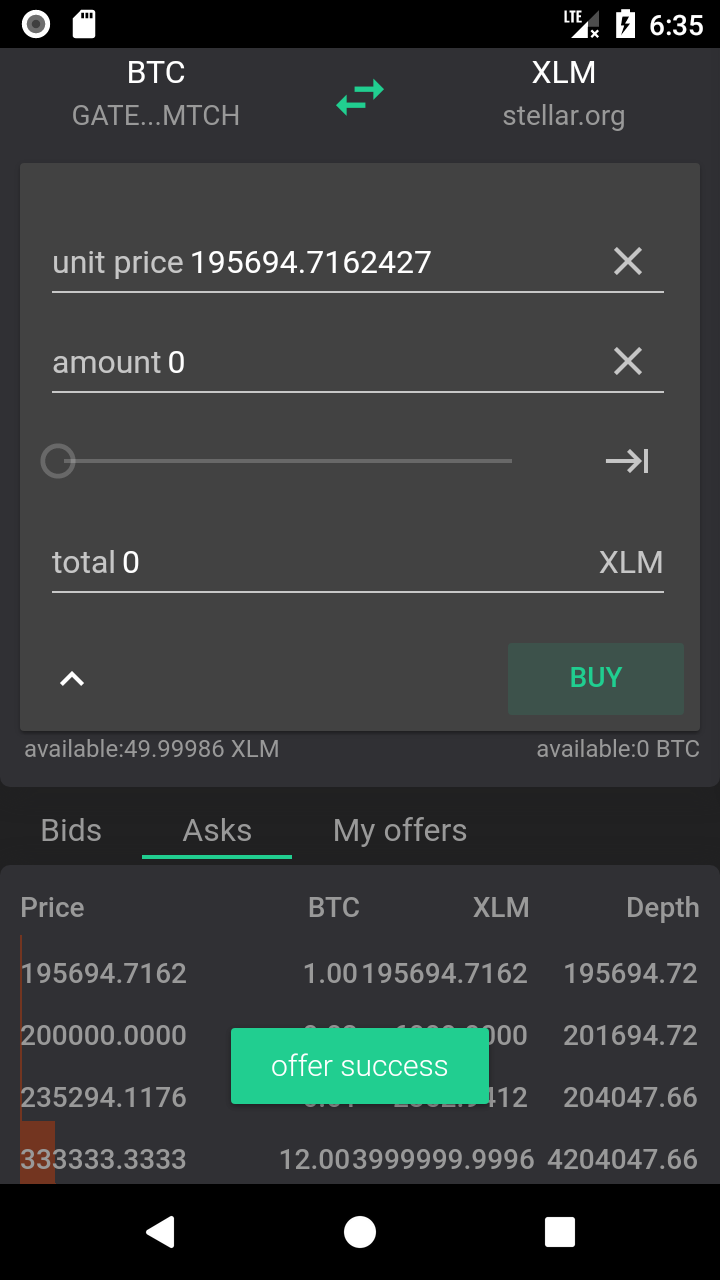
If the offers did not deal, you can check them in "My offers" and cancel them.
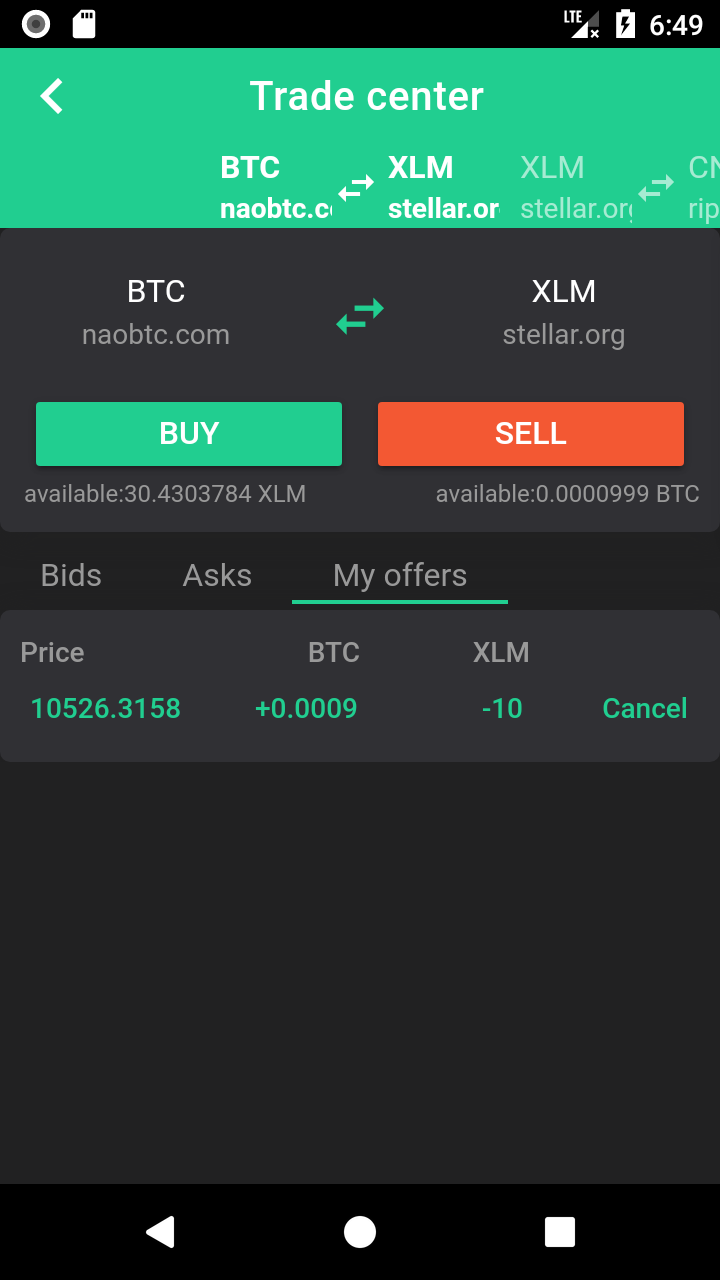
Note: Each offer need extra 10 XLM as reserve until the offers dealt or canceled.
You can trade your all assets in our "Trade Center".
The route is "Menu" → "Trade Center" → Access Trade Center page → "+".
Note: Only the assets you added can be added to the trade pairs book. If not, add it first in "My Assets" page.
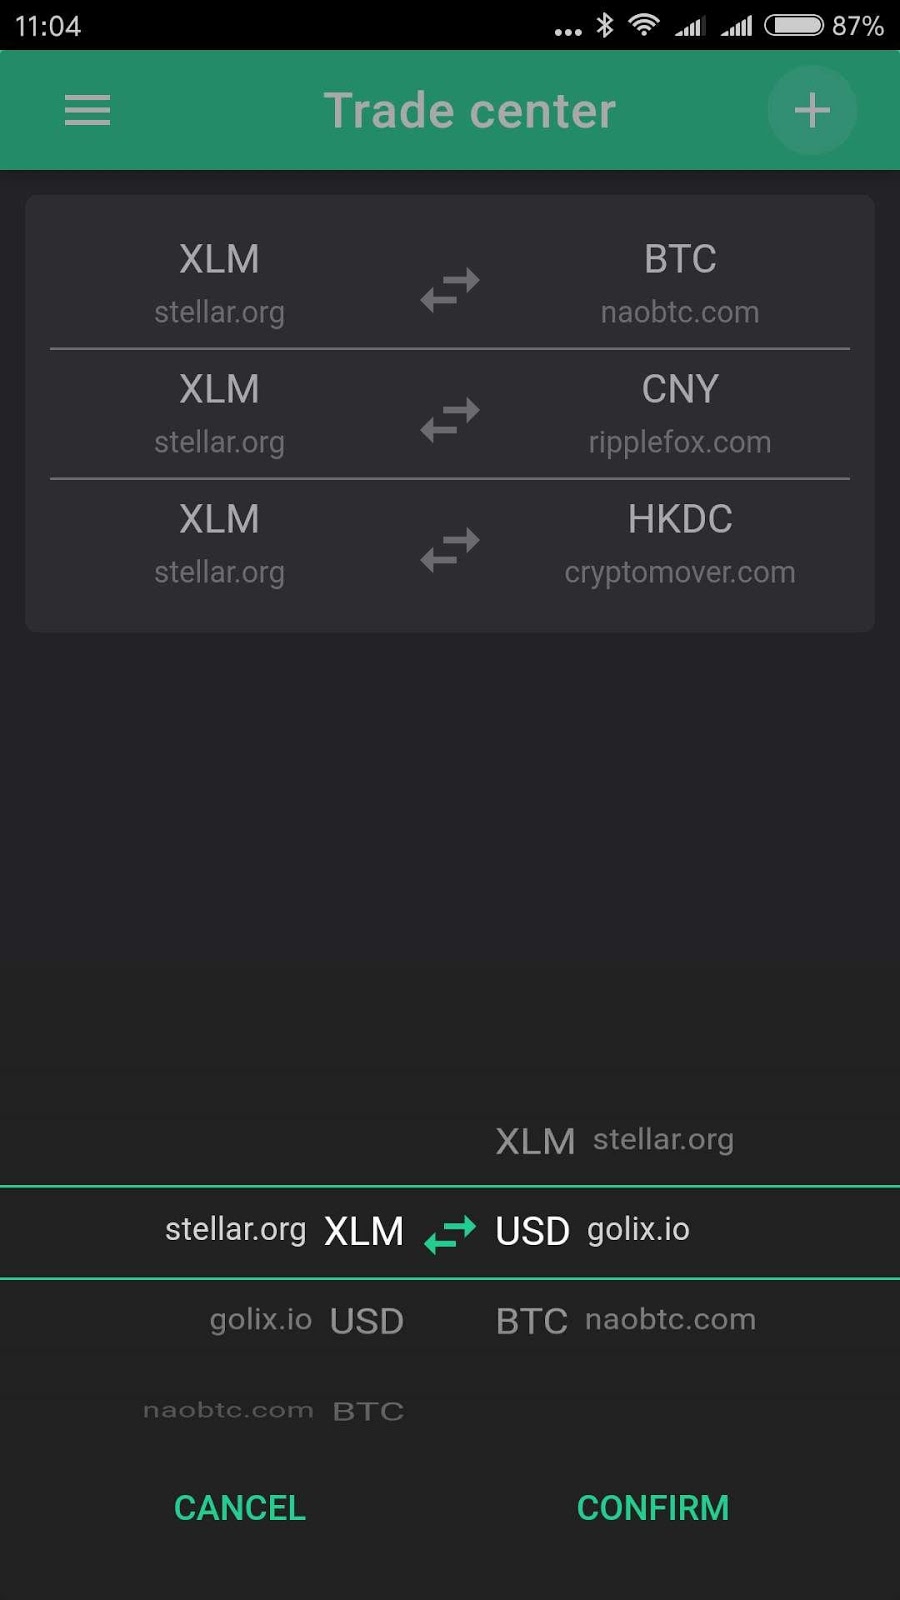
Left asset is Base asset, Right asset is Counter asset.
You can turn the wheel to choose trade pair, then click "CONFIRM" to add trade pair.
Now you can trade them.
We accept many asset deposit, such as BTC, BCH, ETH, XEL, etc.
The route is "Menu" → "Funding" → Access Deposit/ Withdraw page → "Deposit" → Click "Asset ▼" to choose the asset you want to deposit.
Note:
Only the assets you added can be traded. If not, add it first in "My Assets" page. Or you will see the Notice as below:
Please make sure the deposit address is the correct address before you send your asset.
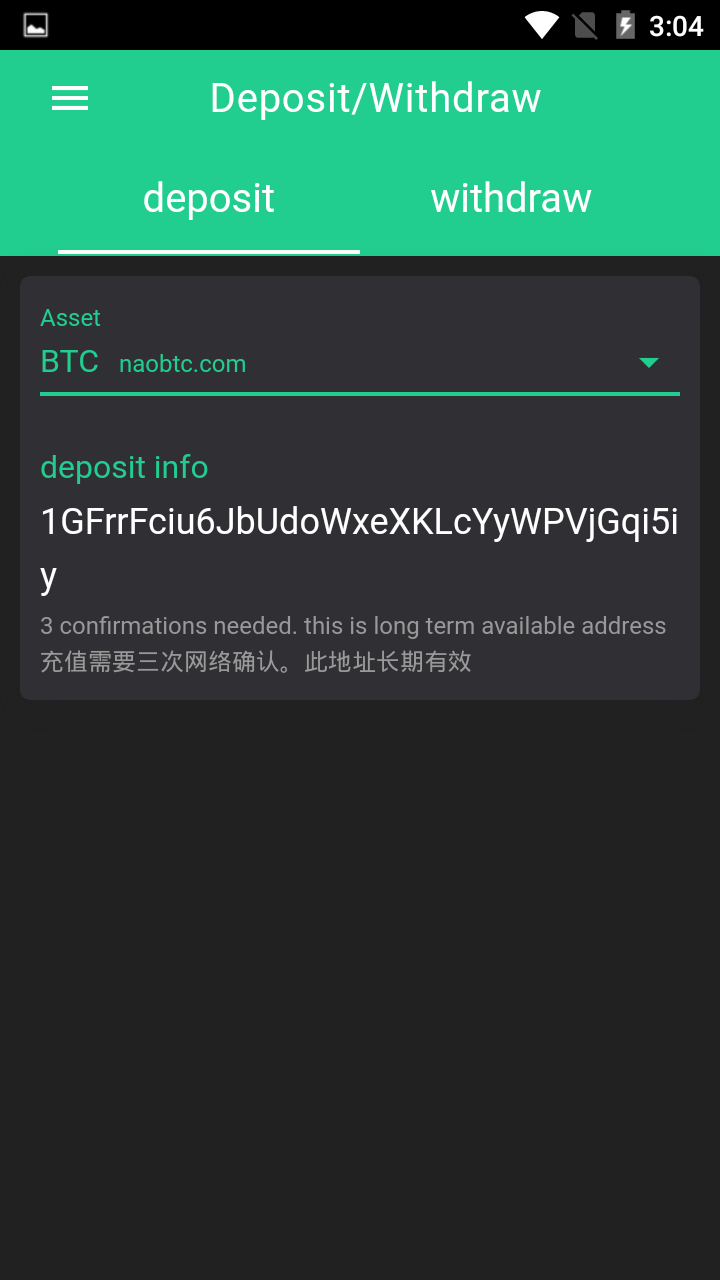
For example, you want to deposit BTC, you can click the deposit BTC address to copy the add and send your BTC to this address. Nearly half an hour, the BTC will be available in our wallet.
The route is "Menu" → "Funding" → Access Deposit/ Withdraw page → "Withdraw" → Click "Asset ▼" to choose the asset you want to withdraw.
Note:
Please make sure the deposit address is the correct address before you withdraw your asset.
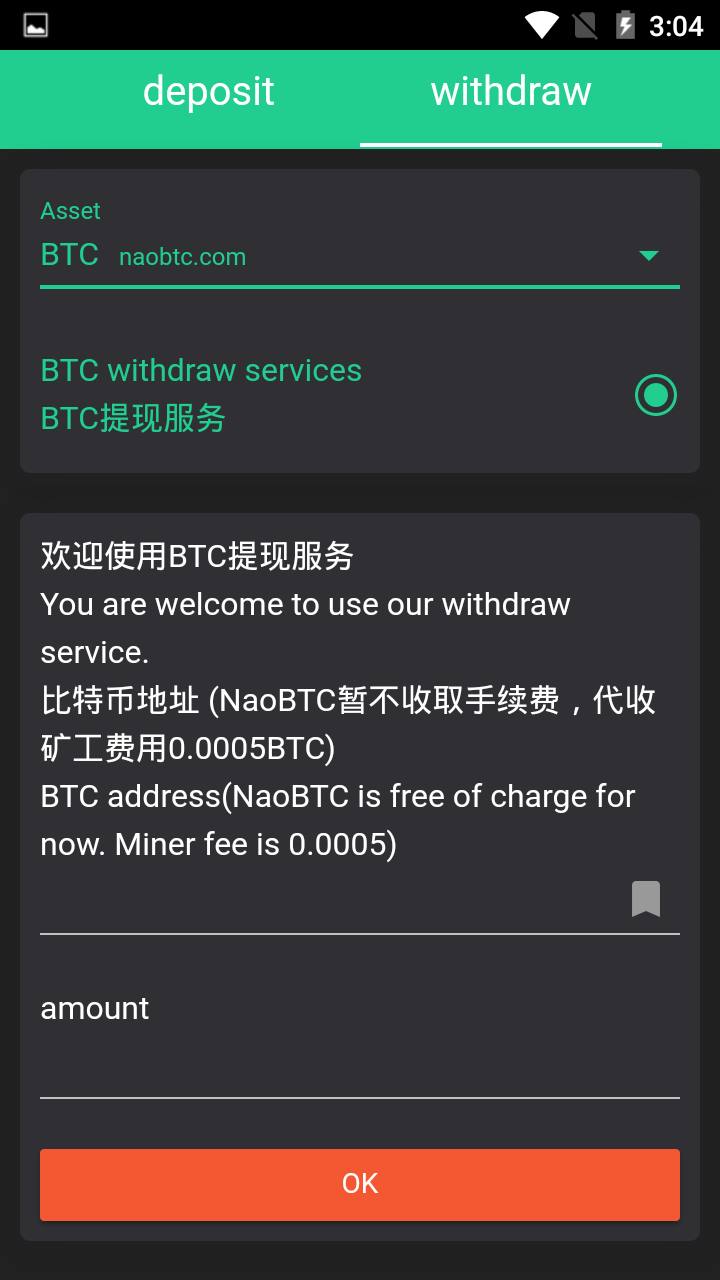
For example, you want to withdraw your BTC, you can fill out the destination BTC address and amount, then click "OK".
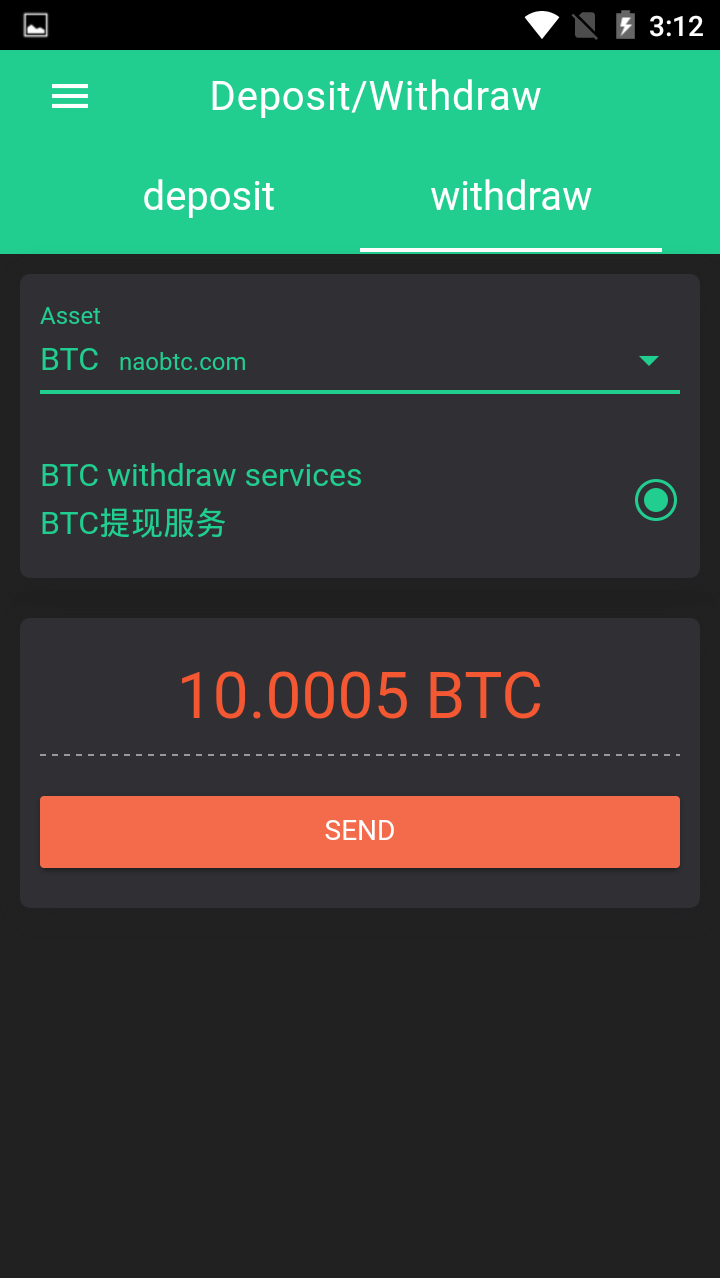
Please confirm the details of this withdrawing.
Please wait 2-5 secs, the withdraw request will be submit to the Stellar Network.
Nearly one hour later, your BTC will be withdrew success.
NOTE: The withdrawing can't be canceled, please confirm all info correct before you send the withdraw request.
There are 3 ways to add your Contact,
- Add contact manually:
You can add Contact manually: in our "Contacts" page.
The route is "Menu" → "Contacts" → Access Contacts page → "+".
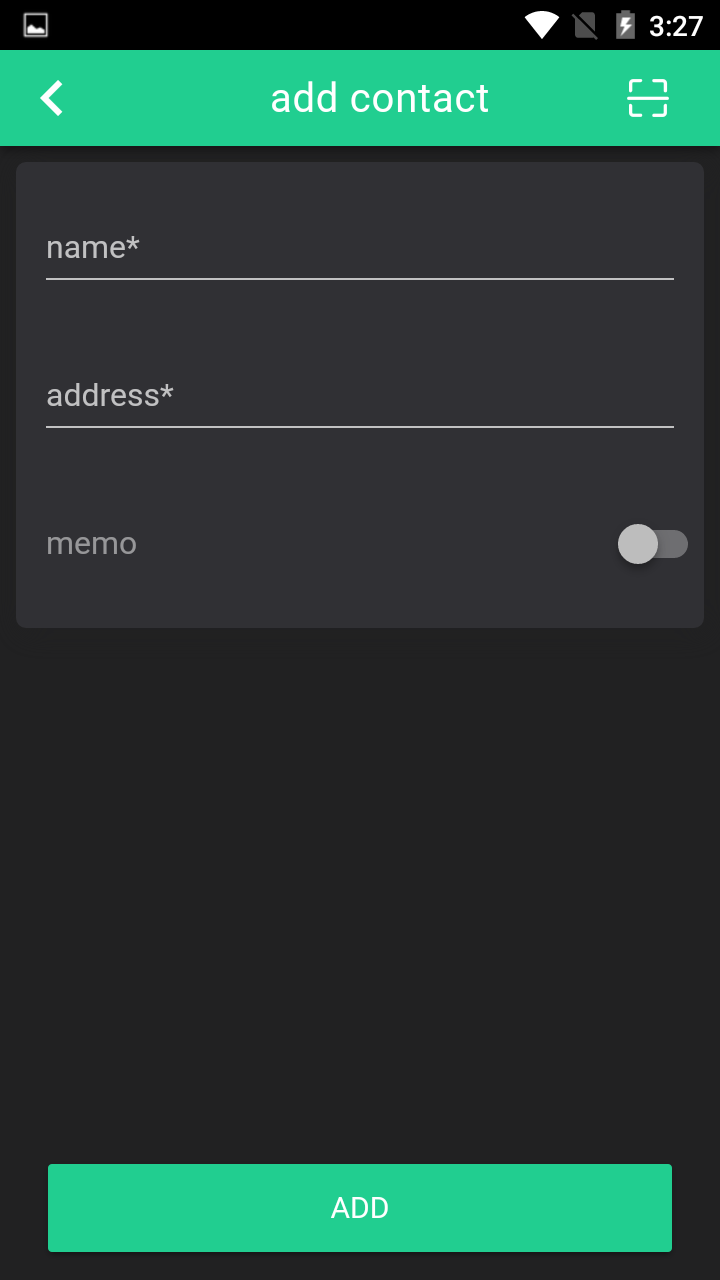
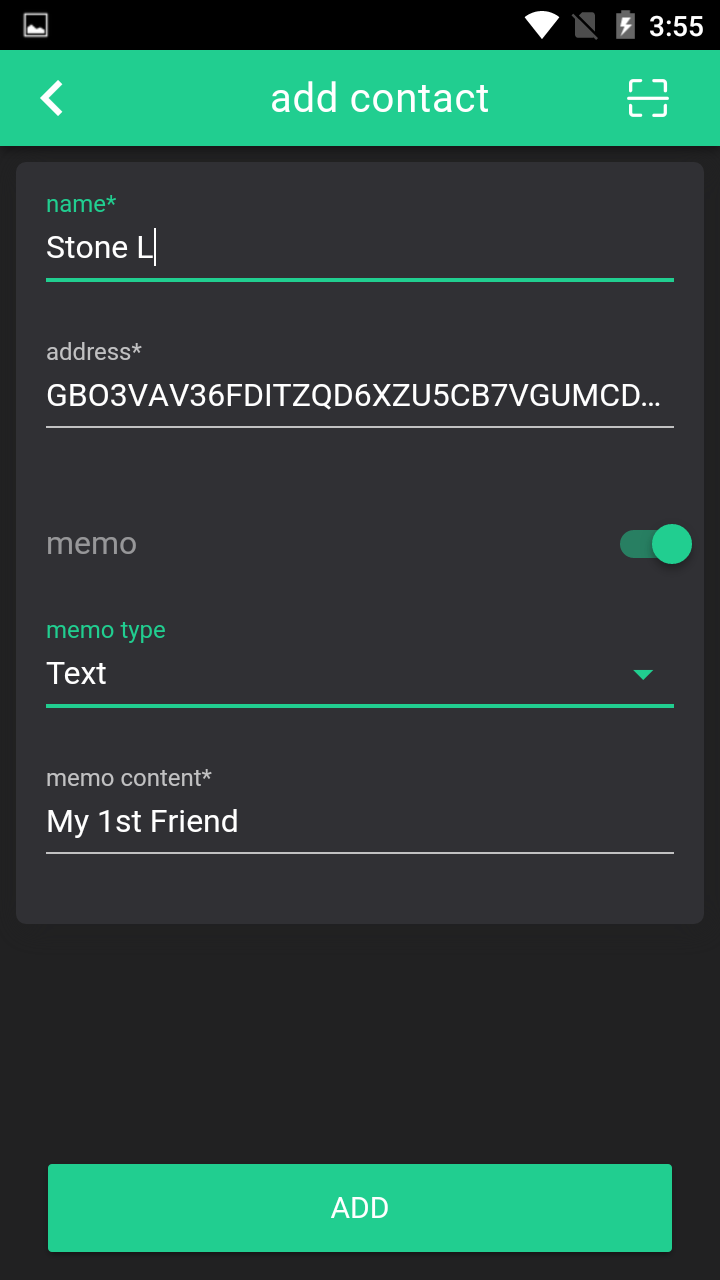
Fill out the details of the contact, you can type the address manually or click "Scan" button in the top right corner to Scan the QR address.
And you can click the "Switch" button to fill out extra info.
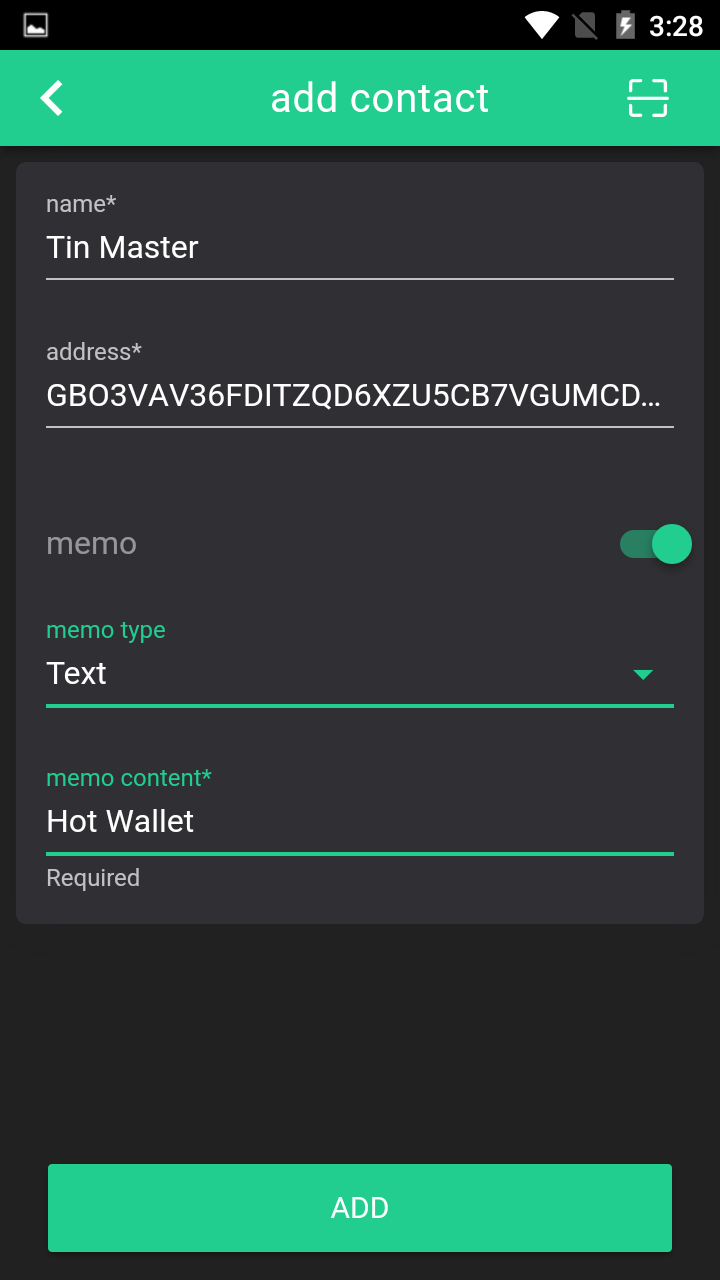
Click "ADD" to Save the contact info.
- Add contact from "My wallet" page
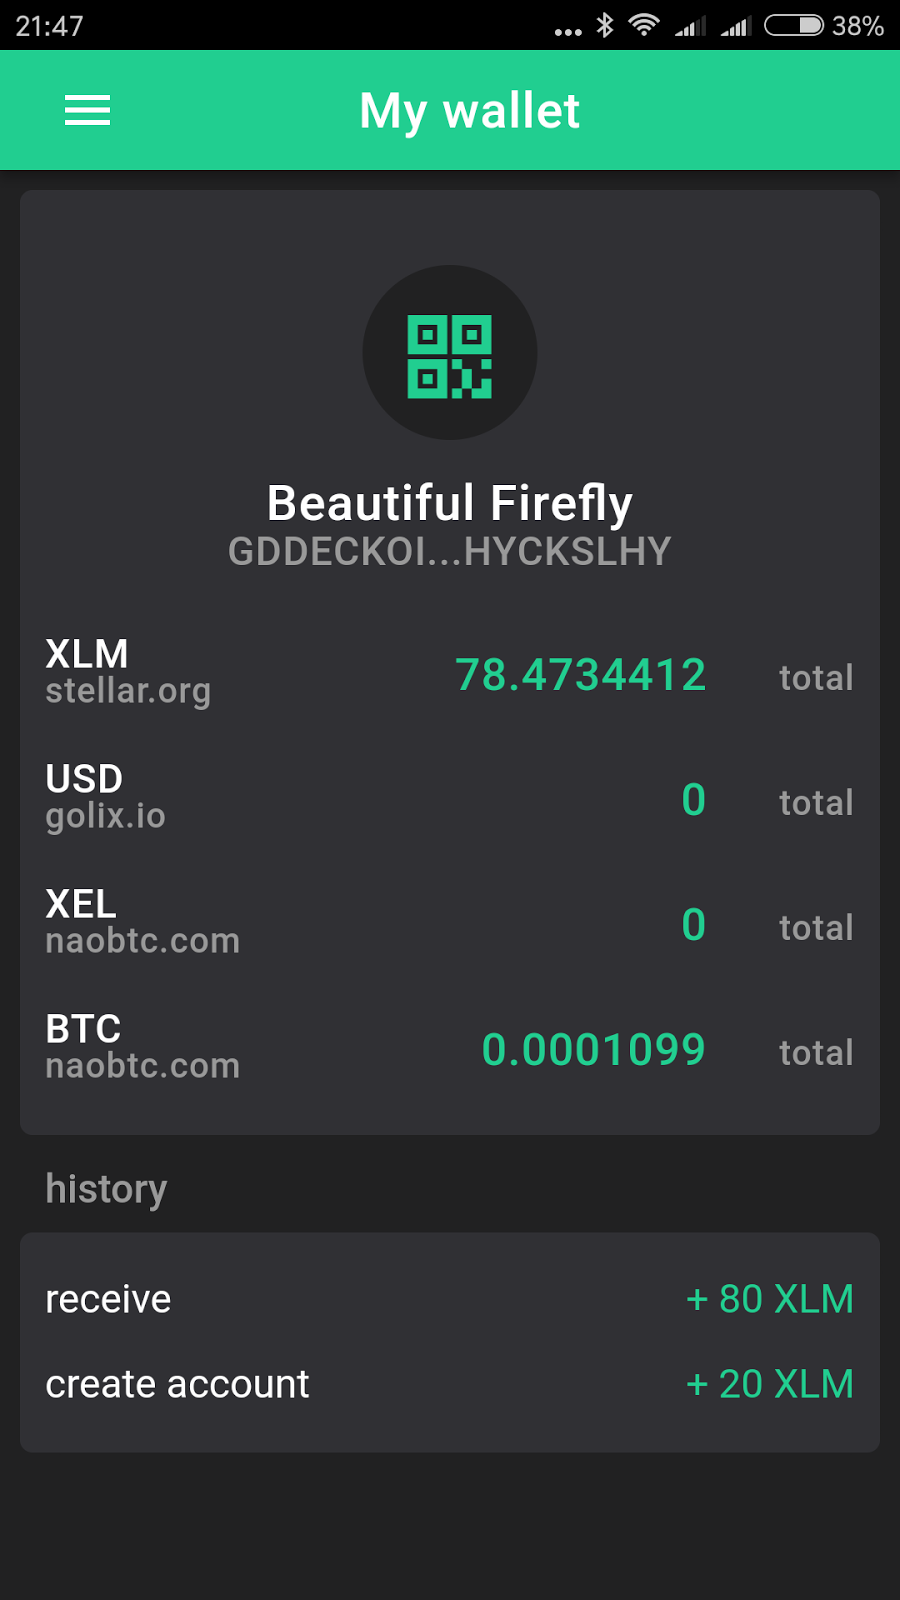
The route is "Menu" → "Your name of the Account" → Access My wallet page → waiting for 2-5 secs.
Choose one record in the "history" you want add the related transaction party.
In the History Details page, you can click "ADD" to add this address to the contact book.
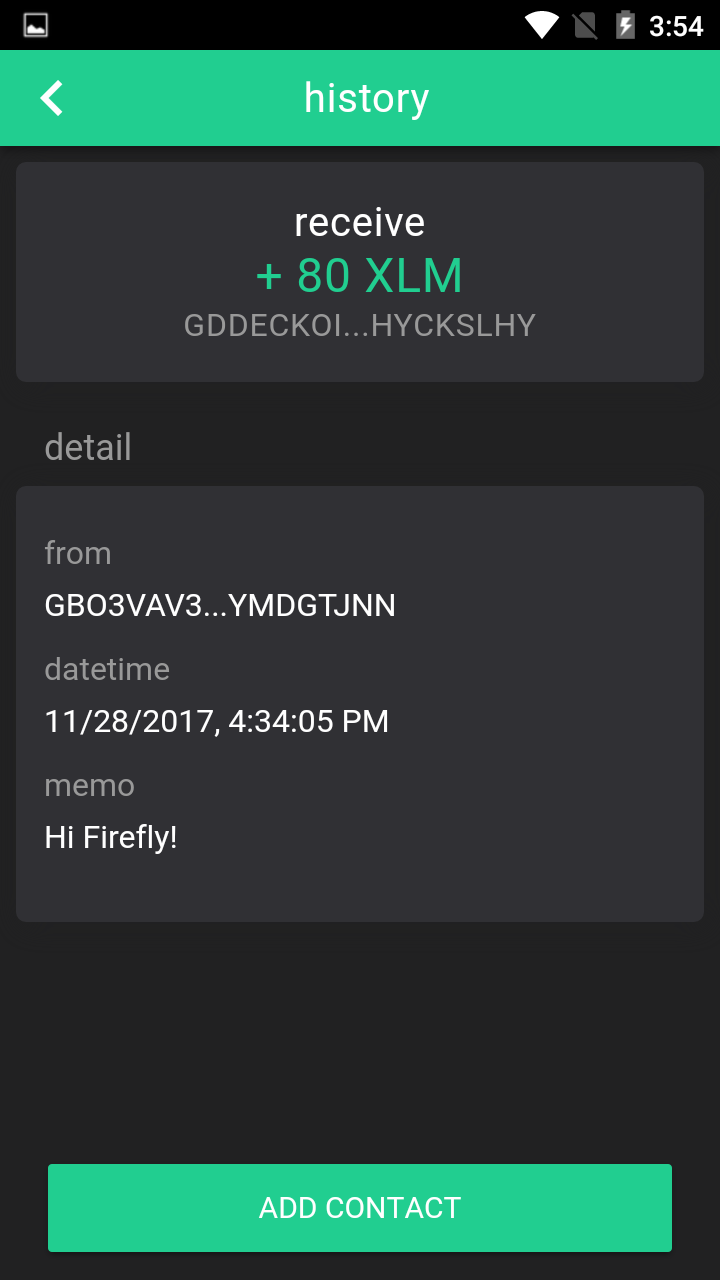
Click "ADD" to Save the contact info.
- Or you can access the history record page from "My asset" page. Other steps are same as the 2nd way.
Except many personal, there are many frequently used address need to collected.
You can add these Address to our "Address book"
The route is "Menu" → "Address book" → Access Address book page → "+".
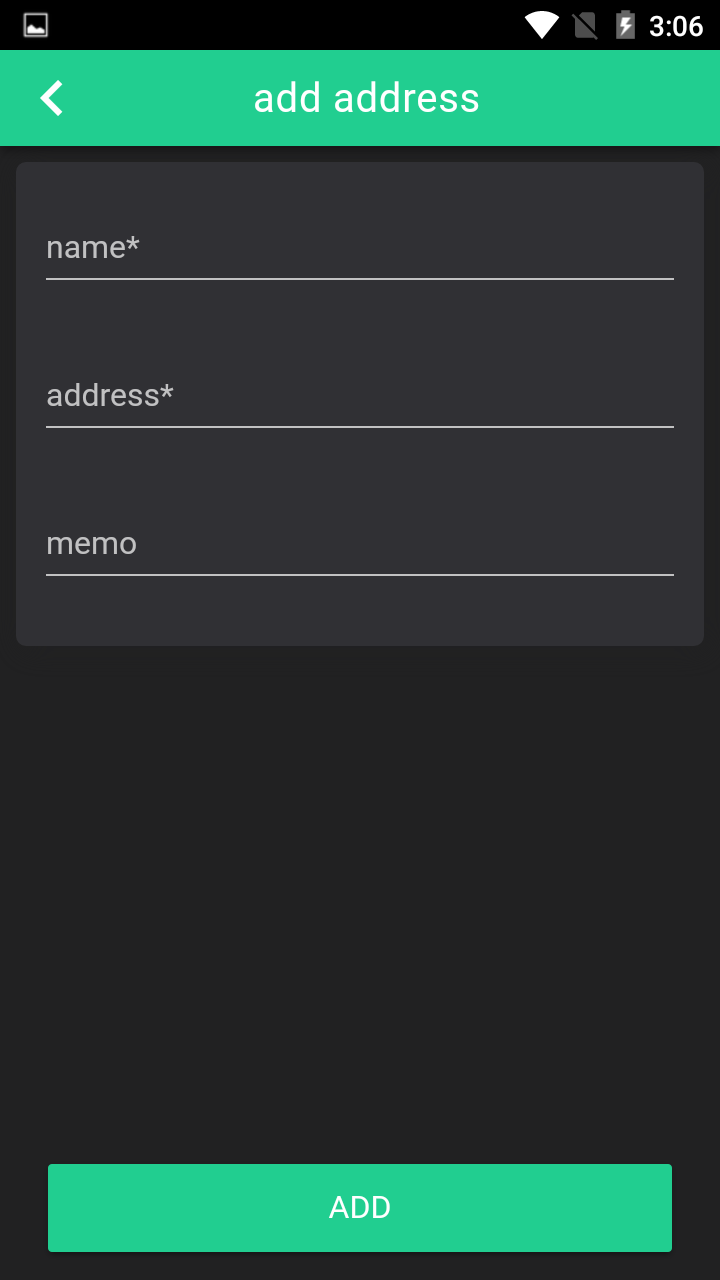
Fill out the details, click "ADD"
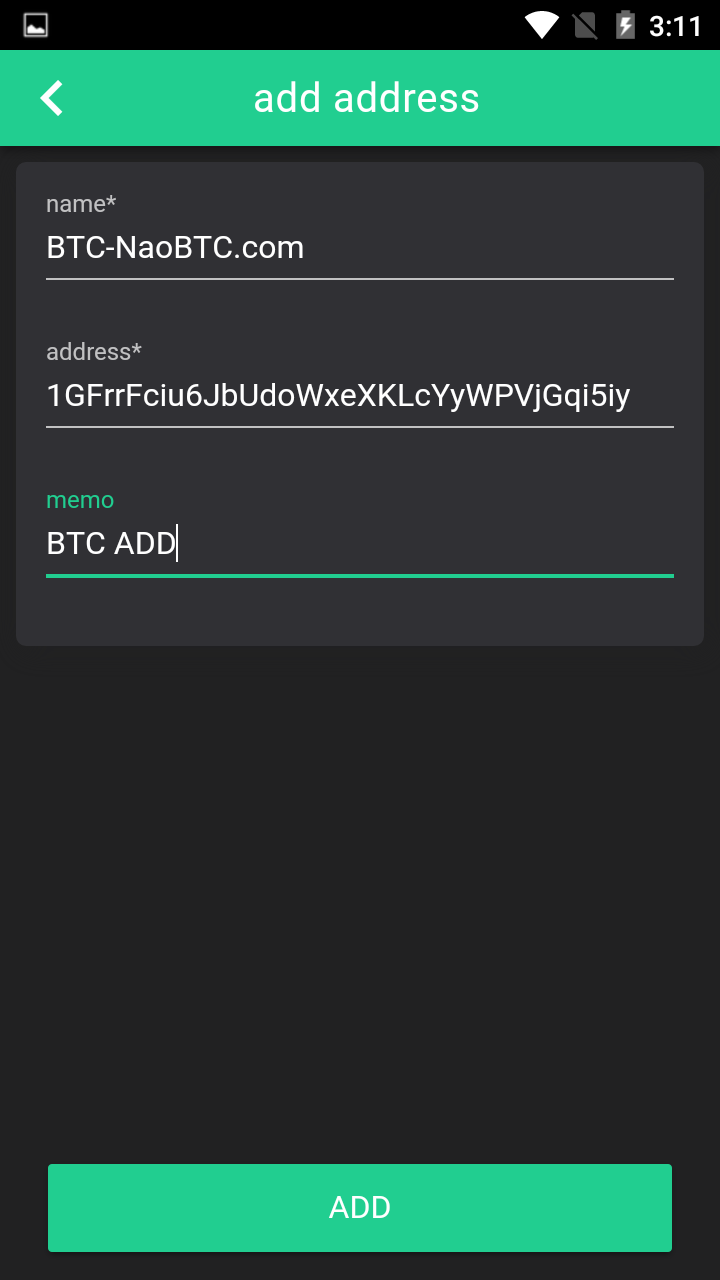
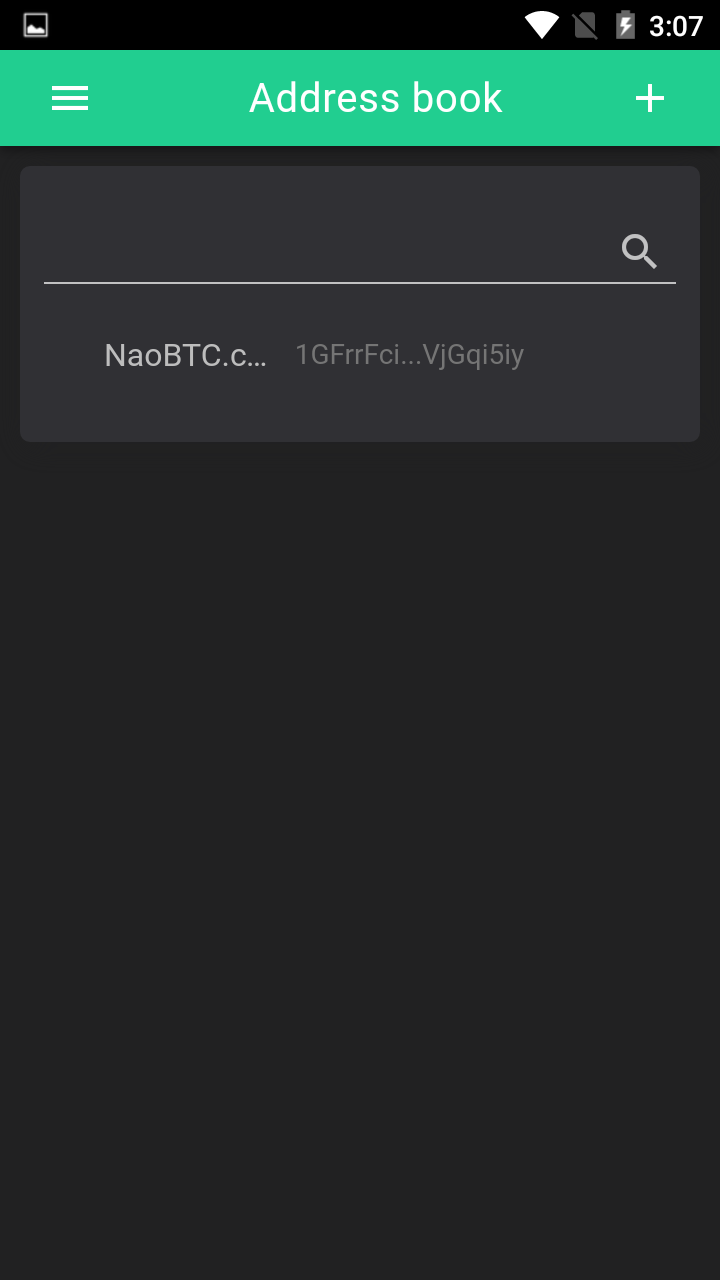
Add success.
May you find Pin code switch in the "Settings" page.
What is this?

Pin code is a code for protecting FIREFLY wallet app.
You can turn the switch on to set 6 numbers as the pin code.
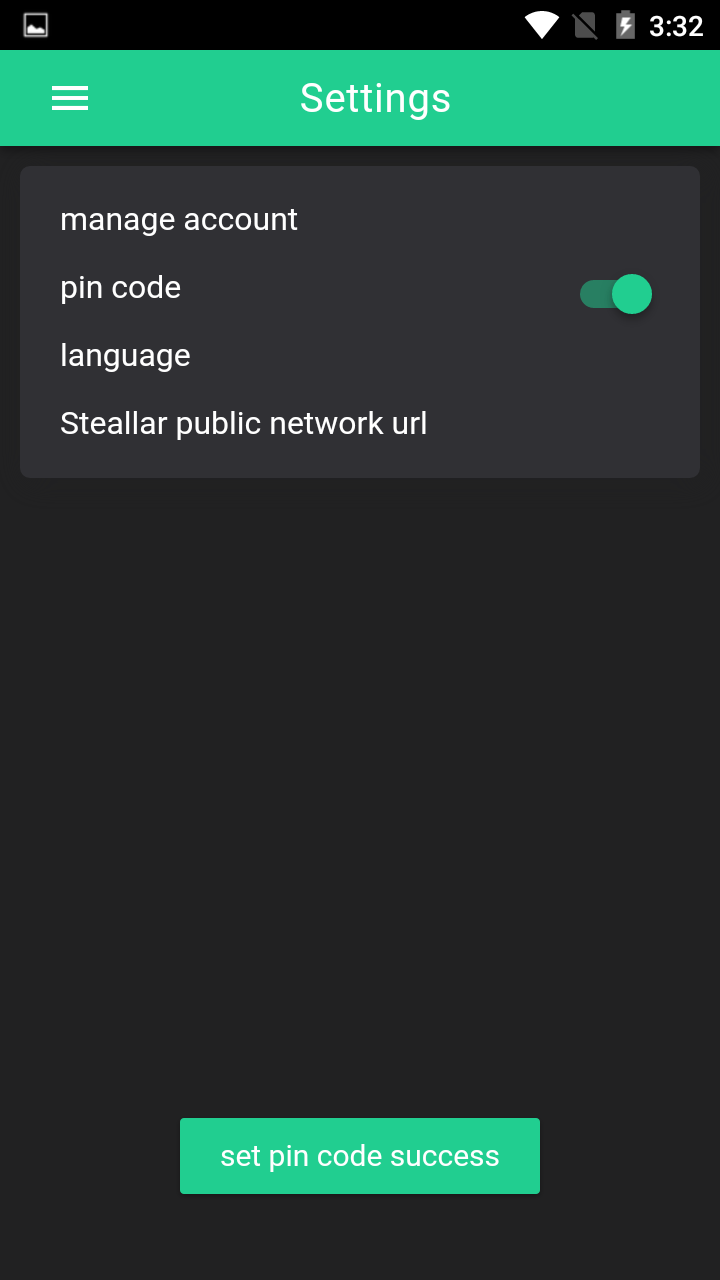
Then you will be asked to input the pin code to open you FIREFLY wallet app each time.
The more Protect, the safer.
Stellar network is a distributed network. That means the servers distributed around the world. If you feel the network is not stable or smooth enough, you can change the server via change the URL.
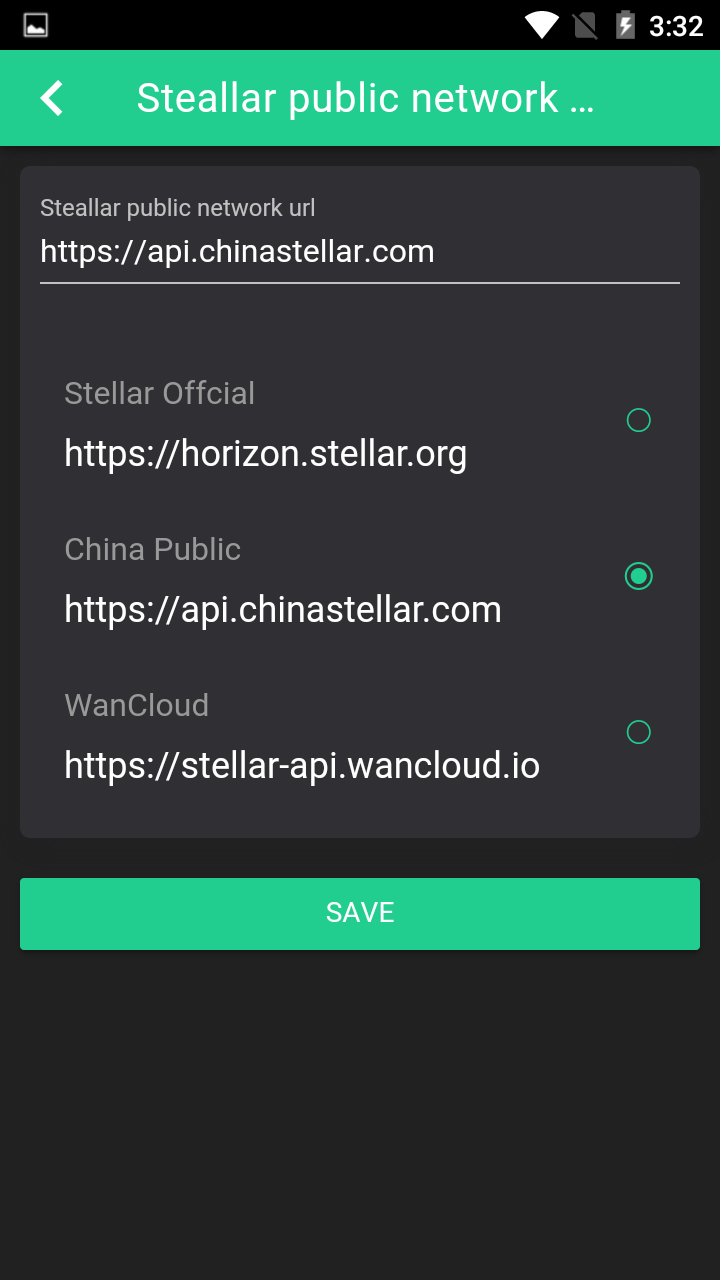
Normally, the 1st URL is our recommended server.
If you found the network congestion, you can try to change the server and click "SAVE".
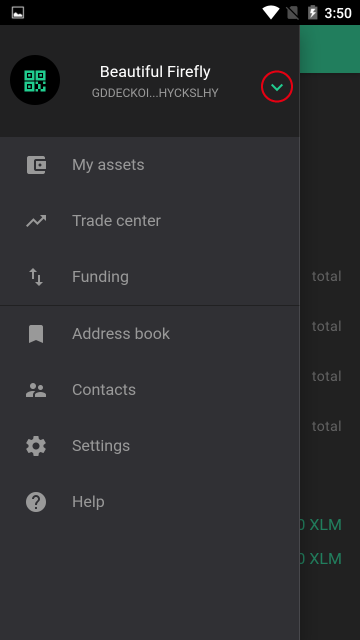
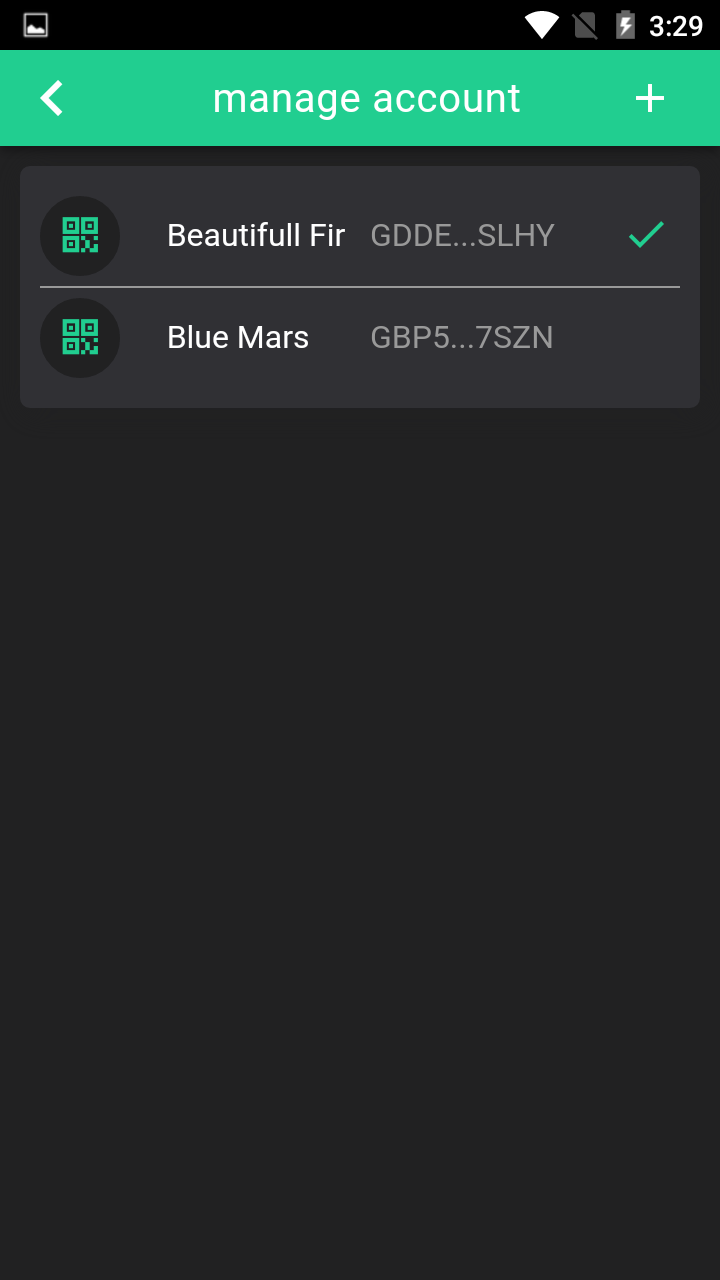
There are two routes to access "Manage account" page.
The 1st route is "Menu" → "Settings" → "Manage account" → access "Manage account" page
The 2nd route is "Menu" → "∨" → unfolding the account list → Click "Manage" button → access "Manage account" page

You will see full accounts list here, the one ticked is the account you are using right now, click one account you want to manage to access account details page.
There is a gimmick, you will not see any operation option on this page until you click the "eye" button.
Note: This action will show the "Secret Key", please make sure nobody or camera is watching your screen.
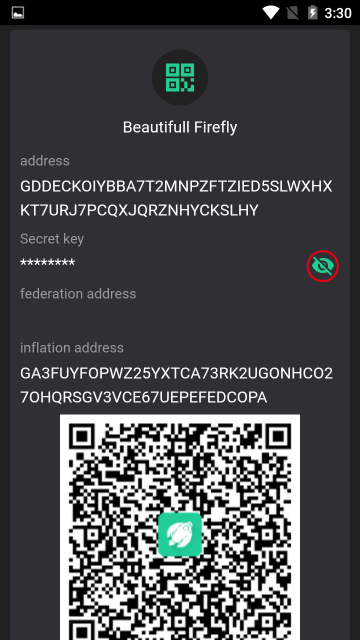
After you input the password, you will see the operation options and the secret key.
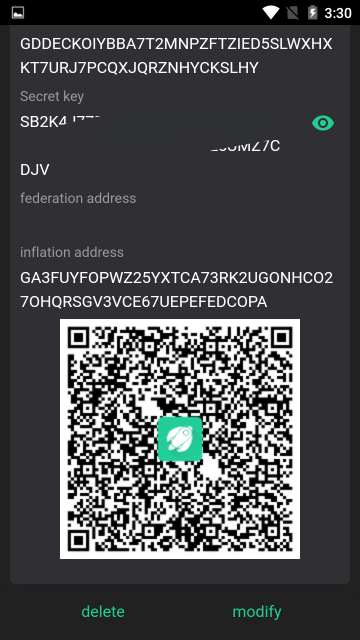
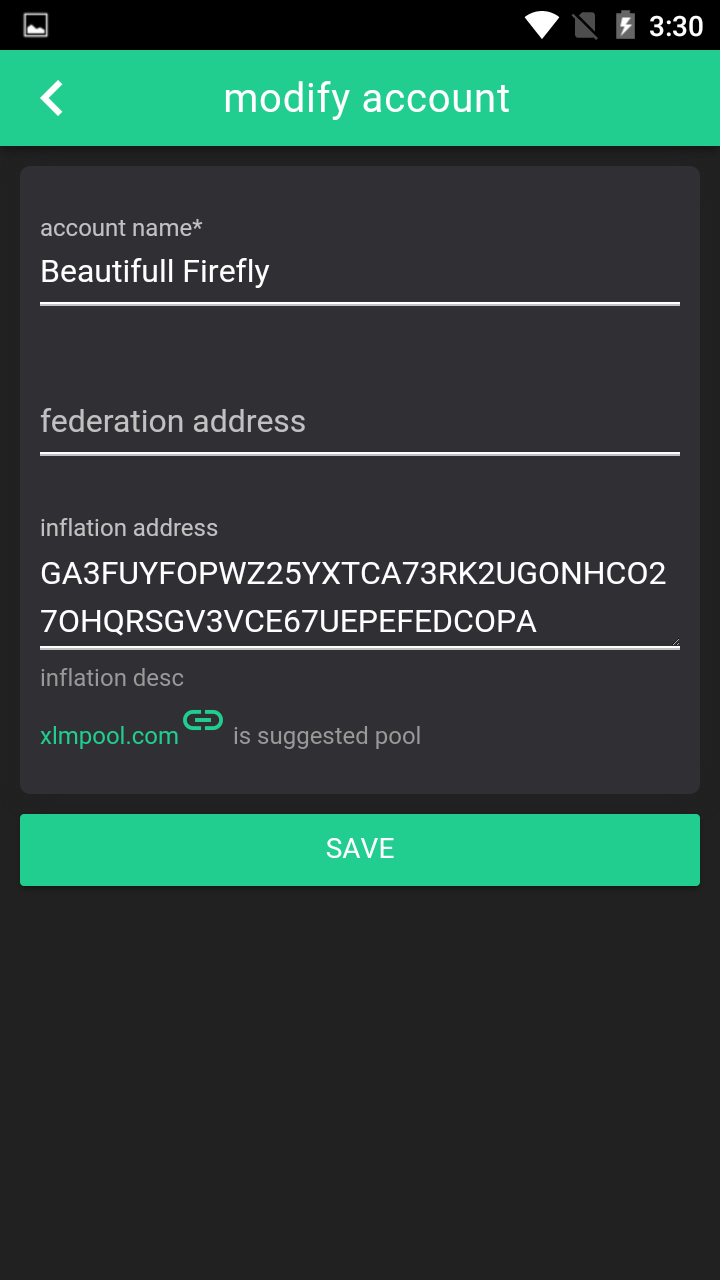
In "Modify" page, you can update your local account name, federation address and inflation address.
If you do not need one account any more, you can delete it.
The Stellar distributed network can be used to track, hold, and transfer any type of asset: dollars, euros, bitcoin, stocks, gold, and other tokens of value. Any asset on the network can be traded and exchanged with any other.
Other than lumens (see below), all assets have
- Asset type: e.g., USD or BTC
- Issuer: the account that created the asset
Trustlines
When you hold assets in Stellar, you're actually holding credit from a particular issuer. The issuer has agreed that it will trade you its credit on the Stellar network for the corresponding asset–e.g., fiat currency, precious metal–outside of Stellar. Let's say that Scott issues oranges as credit on the network. If you hold orange credits, you and Scott have an agreement based on trust, or a trustline: you both agree that when you give Scott an orange credit, he gives you an orange.
When you hold an asset, you must trust the issuer to properly redeem its credit. Since users of Stellar will not want to trust just any issuer, accounts must explicitly trust an issuing account before they're able to hold the issuer's credit. In the example above, you must explicitly trust Scott before you can hold orange credits.
To trust an issuing account, you create a trustline. Trustlines are entries that persist in the Stellar ledger. They track the limit for which your account trusts the issuing account and the amount of credit from the issuing account that your account currently holds.
Lumens (XLM)
Lumens (XLM) are the native currency of the network. A lumen is the only asset type that can be used on the Stellar network that doesn't require an issuer or a trustline. Any account can hold lumens. You can trade lumens for other assets in the network.
In addition to supporting the issuing and movement of assets, the Stellar network also acts as a decentralized distributed exchange of any type of asset that people have added to the network. Its ledger stores both balances held by user accounts and offers that user accounts make to buy or sell assets.
Offers
An account can make offers to buy or sell assets using the Manage Offer operation. In order to make an offer, the account must hold the asset it wants to sell. Similarly, the account must trust the issuer of the asset it's trying to buy.
When an account makes an offer, the offer is checked against the existing orderbook for that asset pair. If the offer crosses an existing offer, it is filled at the price of the existing offer. Let's say that you make an offer to buy 10 XLM for 2 BTC. If an offer already exists to sell 10 XLM for 2 BTC, your offer will take that offer–you'll be 2 BTC poorer but 10 XLM richer.
If the offer doesn't cross an existing offer, the offer is saved in the orderbook until it is either taken by another offer, taken by a payment, canceled by the account that created the offer, or invalidated because the account making the offer no longer has the asset for sale.
Offers in Stellar behave like limit orders in traditional markets.
For offers placed at the same price, the older offer is filled before the newer one.
Orderbook
An orderbook is a record of outstanding orders on the Stellar network. This record sits between any two assets–in this case, let's say the assets are sheep and wheat. The orderbook records every account wanting to buy sheep for wheat on one side and every account wanting to sell sheep for wheat on the other side.
Some assets will have a very thin or nonexistent orderbook between them. That's fine: as discussed in greater detail below, paths of orders can facilitate exchange between two thinly traded assets.
Passive offers
Passive offers allow markets to have zero spread. If you want to offer USD from anchor A for USD from anchor B at a 1:1 price, you can create two passive offers so the two offers don't fill each other.
A passive offer is an offer that does not take a counteroffer of equal price. It will only fill if the prices are not equal. For example, if the best offer to buy BTC for XLM has a price of 100XLM/BTC, and you make a passive offer to sell BTC at 100XLM/BTC, your passive offer does not take that existing offer. If you instead make a passive offer to sell BTC at 99XLM/BTC it would cross the existing offer and fill at 100XLM/BTC.
Cross-asset payments
Suppose you are holding sheep and want to buy something from a store that only accepts wheat. You can create a payment in Stellar that will automatically convert your sheep into wheat. It goes through the sheep/wheat orderbook and converts your sheep at the best available rate.
You can also make more complicated paths of asset conversion. Imagine that the sheep/wheat orderbook has a very large spread or is nonexistent. In this case, you might get a better rate if you first trade your sheep for brick and then sell that brick for wheat. So a potential path would be 2 hops: sheep->brick->wheat. This path would take you through the sheep/brick orderbook and then the brick/wheat orderbook.
These paths of asset conversion can contain up to 6 hops, but the whole payment is atomic–it will either succeed or fail. The payment sender will never be left holding an unwanted asset.
This process of finding the best path of a payment is called pathfinding. Pathfinding involves looking at the current orderbooks and finding which series of conversions gives you the best rate. It is handled outside of Stellar Core by something like Horizon.
Preferred currency
Because cross-asset payments are so simple with Stellar, users can keep their money in whatever asset they prefer to hold. Preferred currency creates a very flexible, open system.
Imagine a world where, anytime you travel, you never have to exchange currency except at the point of sale. A world where you can choose to keep all your assets in, for example, Google stock, cashing out small amounts as you need to pay for things. Cross-asset payments make this world possible.
The Stellar federation protocol maps Stellar addresses to more information about a given user. It's a way for Stellar client software to resolve email-like addresses such as name*yourdomain.com into account IDs like: GCCVPYFOHY7ZB7557JKENAX62LUAPLMGIWNZJAFV2MITK6T32V37KEJU. Stellar addresses provide an easy way for users to share payment details by using a syntax that interoperates across different domains and providers.
Stellar addresses
Stellar addresses are divided into two parts separated by *, the username and the domain.
For example: jed*stellar.org:
- jed is the username,
- stellar.org is the domain.
The domain can be any valid RFC 1035 domain name. The username is limited to printable UTF-8 with whitespace and the following characters excluded: <*,> Although of course the domain administrator can place additional restrictions on usernames of its domain.
Note that the @ symbol is allowed in the username. This allows for using email addresses in the username of an address. For example: maria@gmail.com*stellar.org.
The Stellar network requires qsmall fees on transactions and minimum balances on accounts in order to prevent people from overwhelming the network and to aid in prioritization.
There are two special values used to calculate fees:
The base fee (currently 100 stroops) is used in transaction fees.
The base reserve (currently 20 XLM) is used in minimum account balances.
Transaction Fee
The fee for a transaction is the number of operations the transaction contains multiplied by the base fee, which is 100 stroops (0.00001 XLM).
(# of operations × base fee)
For example, a transaction that allows trust on an account's trustline (operation 1) and sends a payment to that account (operation 2) would have a fee of 2 × base fee = 200 stroops.
Stellar deducts the entire fee from the transaction's source account, regardless of which accounts are involved in each operation or who signed the transaction.
Transaction Limits
Each Stellar node usually limits the number of transactions that it will propose to the network when a ledger closes. If too many transactions are submitted, nodes propose the transactions with the highest fees for the ledger's transaction set. Transactions that aren't included are held for a future ledger, when fewer transactions are waiting.
See transaction life cycle for more information.
Fee Pool
The fee pool is the lot of lumens collected from transaction fees.
Stellar does not retain these lumens. They are distributed in the weekly process of inflation voting.
If there are any unallocated lumens after the vote, those lumens return to the fee pool for dispersal in the next round.
Minimum Account Balance
All Stellar accounts must maintain a minimum balance of lumens. Any transaction that would reduce an account's balance to less than the minimum will be rejected with an INSUFFICIENT_BALANCE error.
The minimum balance is calculated using the base reserve, which is 10 XLM:
(2 + # of entries) × base reserve
The minimum balance for a basic account is 2 × base reserve. Each additional entry costs the base reserve. Entries include:
- Trustlines
- Offers
- Signers
- Data entries
For example, an account with 1 trustline and 2 offers would have a minimum balance of (2 + 3)× base reserve = 50 XLM.
Fee Changes
The base reserve and base fee can change, but should not do so more than once every several years. For the most part, you can think of them as fixed values. When they are changed, the change works by the same consensus process as any transaction. For details, see versioning.
You can look up the current fees by checking the details of the latest ledger.
The Stellar distributed network has a built-in, fixed, nominal inflation mechanism. New lumens are added to the network at the rate of 1% each year. Each week, the protocol distributes these lumens to any account that gets over .05% of the "votes" from other accounts in the network.
How inflation voting works
Using the set options operation, every account selects another account as its inflation destination, or nominee to receive new currency. The inflation destination will persist until changed with another set options operation.
Voting is weighted according to the number of lumens the voting account holds. For example, if account A has 120 lumens and sets its inflation destination to B, the network counts 120 votes for B.
The distribution of new lumens is limited to once a week. Inflation is run in response to an inflation operation that anyone can submit to the network. This operation will fail if the inflation sequence number isn't one after the last sequence number. It will also fail if (sequence number * 1 week) of time hasn't elapsed since the network start date.
Each time inflation is run, the lumens used to pay transaction fees since the last voting round are also included in the total lumens distributed.